LSPS Documentation
You can change the layout of the components of your Application User Interface as well as the components that appear in the application by editing LspsUI which extends Vaadin's UI component.
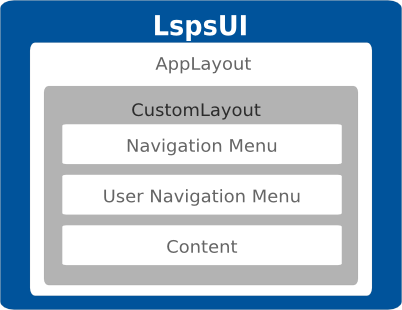
The underlying default component tree of the Application User Interface is as follows:
LspsUI that extends Vaadin's UI
It represents the root component and holds the user info and connector to the LSPS server. It can contain only one AppLayout object as its child.
applayout: An AppLayout instance that extends CustomComponent and implements ViewDisplay
Since it is a CustomComponent, it can have only one child component.
layout: A CustomLayout instance which loads the layout template <APP>-vaadin-war/src/main/webapp/VAADIN/themes/<THEME>/layouts/page.html.
It holds the following layout components of the default Application User Interface:
The components of the default application screen are defined in the vaadin.core package. The root screen component is defined in the LspsUI class that extends the Vaadin UI class.
Its init() method creates the content root layout and a connector between LSPS forms and your app, called the AppConnector, and calls the initLayout() method which assembles the screen content.
Therefore, if you want to change the components of the application, you will be mostly editing the initLayout() methods.
If you decide to implement the LspsUI class anew to create your own custom application, make sure it meets the following requirements:
login.jsp and in the WEB-INF/web.xml.To add a custom item to the navigation menu, do the following:
Locate the //Examples: comment in the buildMenu() method: call the addDocumentItem() or addRunModelItem() method calls as appropriate to add your items to the menu.
The examples demonstrate how to add custom items to the Navigation menu: to preview them, set the if condition to true, compile and run the application.
When adding custom items, consider whether the user permissions need to be taken into account: if this is required, use the respective methods, such as, User's hasRightToOpenDocument().
To add a footer or header to the content area of the application by modifying the Vaadin component tree, do the following:
To provide a new localization setting and sources, do the following:
<YOUR_APP>-vaadin/src/main/resources/com/whitestein/lsps/vaadin/webapp/localization.properties file as a template for your properties file.<YOUR_APP>-vaadin/src/main/resources/com/whitestein/lsps/vaadin/webapp/ directory.<YOUR_APP>-vaadin/src/main/java/org/<YOUR_APP>/<>/vaadin/page/AppSettingsView.java and add the definition to the createSettingsSection() method. The language code is based on the java.util.Locale class.
private VerticalLayout createSettingsSection(LspsUI ui) {
  VerticalLayout settings = new VerticalLayout();
  settings.setSpacing(true);

  Label settingsHeader = new Label("<h2>" + ui.getMessage("settings.applicationSection") + "</h2>", ContentMode.HTML);
  settings.addComponent(settingsHeader);

  this.languages = new OptionGroup(ui.getMessage("settings.language"));
  languages.addStyleName("ui-spacing");
  languages.addItem("en_US");
  languages.setItemCaption("en_US", English);
  languages.addItem("de_DE");
  languages.setItemCaption("de_DE", Deutsch);
  languages.addItem("sk_SK");
  languages.setItemCaption("sk_SK", Slovensky);
  //Italian localization setting:
  languages.addItem("it_IT");
  languages.setItemCaption("it_IT", Italiano);

  languages.setValue(ui.getLocale().toString());
  settings.addComponent(languages);
  return settings;
}