LSPS Documentation
In this tutorial, you set up a MySQL database with LSPS tables, set up the WildFly server, deploy the LSPS Application to the WildFly server, and connect to the server from PDS. We assume you are on Linux.
Important: This environment is not intended for production. For simplicity, resources are set up in the home directory and no security aspects are taken into consideration. More detailed deploy instructions are available in the Deployment Guide.
You will need the following:
mysql -u root -pCREATE USER 'lsps'@localhost;
CREATE DATABASE lsps DEFAULT CHARACTER SET utf8 DEFAULT COLLATE utf8_general_ci;
GRANT ALL PRIVILEGES ON lsps.* TO lsps@'' IDENTIFIED BY 'lsps';
FLUSH PRIVILEGES;[mysqld] section of the mysqld.conf file, add max_allowed_packet=512M. On Windows, define this in your C:\ProgramData\MySQL\MySQL Server 5.7\my.ini in the mysql installation directory. $ grep max_allowed /etc/mysql/mysql.conf.d/mysqld.cnf
max_allowed_packet = 512Mmigrate.sh script from lsps-runtime/db-migration. ./migrate.sh databaseUrl:jdbc:mysql://localhost/lsps user:lsps password:lspsInitialized Database
mysql> USE lsps;
Database changed
mysql> SHOW TABLES;
+--------------------------------+
| Tables_in_lsps                 |
+--------------------------------+
| LSPS_ACTIVE_USERS_TRACK        |
| LSPS_BINARY_DATA               |
| LSPS_BINARY_DATA_METADATAS     |
| LSPS_DASHBOARD_TABS            |
...
~$ unzip Downloads/wildfly-11.0.0.Final.zip
~$ mv wildfly-11.0.0.Final/ wildfly
export JAVA_HOME=/usr/lib/jvm/java-8-oracle
export PATH=$JAVA_HOME/bin:$PATH
~$ cd Downloads
~/Downloads/$ unzip mysql-connector-java-5.1.46.zip
~$ cd ..; mkdir -p wildfly/modules/com/mysql/main
~$ cp Downloads/mysql-connector-java-5.1.46/mysql-connector-java-5.1.46-bin.jar wildfly/modules/com/mysql/main/mysql-connector-java.jar
~$ cat wildfly/modules/com/mysql/main/module.xml
<module xmlns="urn:jboss:module:1.0" name="com.mysql">
  <resources>
     <resource-root path="mysql-connector-java.jar"/>
  </resources>
  <dependencies>
    <module name="javax.api"/>
    <module name="javax.transaction.api"/>
  </dependencies>
</module>
~$ mkdir -p wildfly/modules/com/whitestein/lsps/security/main
~$ cp ~/Downloads/lsps-runtime/lsps-security-jboss-3.2.jar wildfly/modules/com/whitestein/lsps/security/main/lsps-security-jboss.jar
cat wildfly/modules/com/whitestein/lsps/security/main/module.xml
<module xmlns="urn:jboss:module:1.0" name="com.whitestein.lsps.security">
  <resources>
    <resource-root path="lsps-security-jboss.jar"/>
  </resources>
  <dependencies>
    <module name="javax.api"/>
    <module name="javax.transaction.api"/>
    <module name="org.picketbox" />
  </dependencies>
</module>
~$ ./wildfly/bin/add-user.sh -u admin -p admin
wildfly/standalone/configuration/standalone-full.xml:<datasources>
<!-- ADDED: -->
<xa-datasource jndi-name="java:/jdbc/LSPS_DS" pool-name="LSPS_DS" enabled="true" use-java-context="false">
<xa-datasource-property name="URL">
jdbc:mysql://localhost:3306/lsps
</xa-datasource-property>
<driver>mysqlxa</driver>
<transaction-isolation>TRANSACTION_READ_COMMITTED</transaction-isolation>
<xa-pool>
<min-pool-size>10</min-pool-size>
<max-pool-size>20</max-pool-size>
<prefill>true</prefill>
</xa-pool>
<security>
<user-name>lsps</user-name>
<password>lsps</password>
</security>
</xa-datasource>
<drivers>
  <driver name="h2" module="com.h2database.h2">
      <xa-datasource-class>org.h2.jdbcx.JdbcDataSource</xa-datasource-class>
  </driver>
  <!-- ADDED: --_>
  <driver name="mysqlxa" module="com.mysql">
     <xa-datasource-class>com.mysql.cj.jdbc.jdbc2.optional.MysqlXADataSource</xa-datasource-class>
  </driver>
<subsystem xmlns="urn:jboss:domain:security:2.0">
    <security-domains>
        <security-domain name="lspsRealm" cache-type="default">
             <authentication>
                 <login-module code="com.whitestein.lsps.security.jboss.LSPSRealm" flag="required" module="com.whitestein.lsps.security">
                     <module-option name="dsJndiName" value="/jdbc/LSPS_DS"/>
                 </login-module>
             </authentication>
         </security-domain>
<cache-container name="web" default-cache="passivation" module="org.wildfly.clustering.web.infinispan">
       <local-cache name="passivation">
       <locking isolation="REPEATABLE_READ" acquire-timeout="600000"/>
<mail-session name="lspsmail" jndi-name="java:jboss/mail/LSPS_MAIL">
        <smtp-server outbound-socket-binding-ref="mail-smtp"/>
    </mail-session>
<subsystem xmlns="urn:jboss:domain:messaging-activemq:2.0">: <server name="default" persistence-enabled="true">
<jms-queue name="LSPS_QUEUE" entries="java:jboss/jms/LSPS_QUEUE"/>
    <jms-topic name="LSPS_TOPIC" entries="java:jboss/jms/LSPS_TOPIC"/>
~$ cat wildfly/bin/standalone.conf
if [ "x$JBOSS_MODULES_SYSTEM_PKGS" = "x" ]; then
   JBOSS_MODULES_SYSTEM_PKGS="org.jboss.byteman"
fi
if [ "x$JAVA_OPTS" = "x" ]; then
    JAVA_OPTS="-Xms64m -Xmx800M -XX:MetaspaceSize=96M -XX:MaxMetaspaceSize=256m -Djava.net.preferIPv4Stack=true"
    JAVA_OPTS="$JAVA_OPTS -Djboss.server.default.config=standalone-full.xml"
    JAVA_OPTS="$JAVA_OPTS -Dorg.eclipse.emf.ecore.EPackage.Registry.INSTANCE=org.eclipse.emf.ecore.impl.EPackageRegistryImpl"
    JAVA_OPTS="$JAVA_OPTS -Dorg.apache.el.parser.COERCE_TO_ZERO=false"
    JAVA_OPTS="$JAVA_OPTS -Dcom.whitestein.lsps.vaadin.ui.debug=true"
else
   echo "JAVA_OPTS already set in environment; overriding default settings with values: $JAVA_OPTS"
fi
set "JAVA_OPTS=-Xms64m -Xmx800M -XX:MetaspaceSize=96M -XX:MaxMetaspaceSize=256m -Djava.net.preferIPv4Stack=true"
rem # ADD THE FOLLOWING:
set "JAVA_OPTS=%JAVA_OPTS% -Djboss.server.default.config=standalone-full.xml"
set "JAVA_OPTS=%JAVA_OPTS% -Dorg.eclipse.emf.ecore.EPackage.Registry.INSTANCE=org.eclipse.emf.ecore.impl.EPackageRegistryImpl"
set "JAVA_OPTS=%JAVA_OPTS% -Dorg.apache.el.parser.COERCE_TO_ZERO=false"
cp ~/Downloads/lsps-runtime/lsps-application-3.2.ear ~/wildfly/standalone/deployments/
~/wildfly/bin$ ./standalone.sh
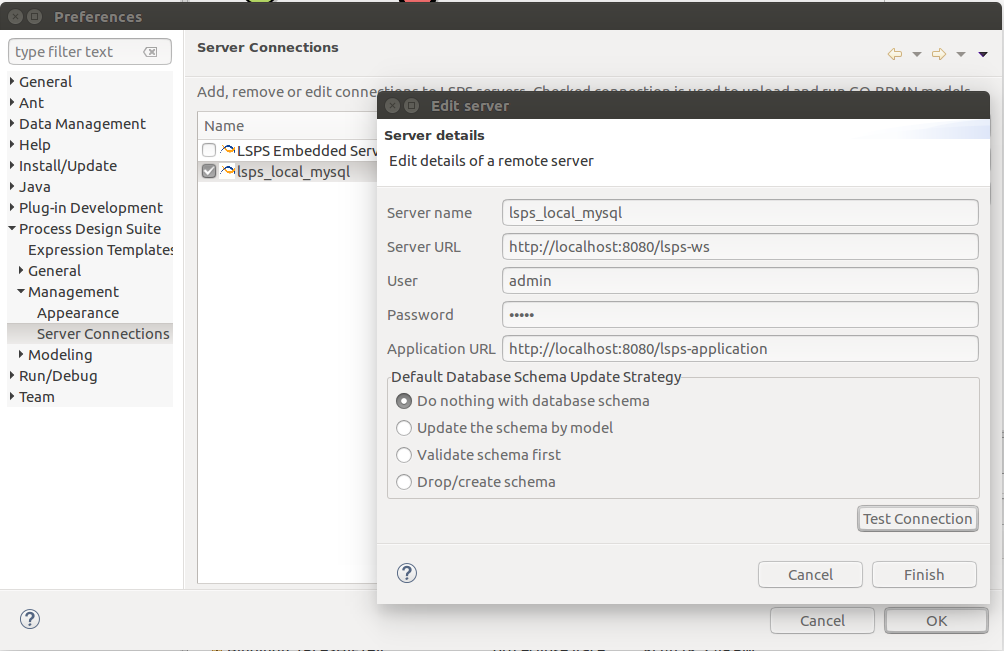
To connect your PDS to the server, do the following: