LSPS Documentation
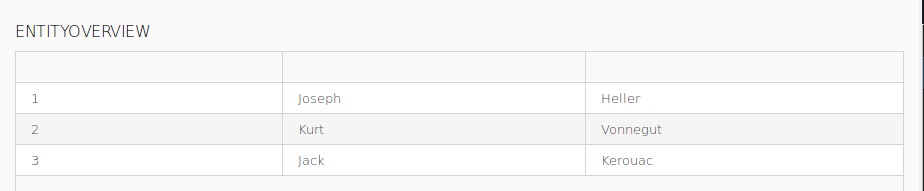
We will create a document with an editable overview of persisted entities: the user will be able to switch the entity type displayed in the grid, edit and delete any entry.
First, prepare the persisted data that will be displayed in the document:
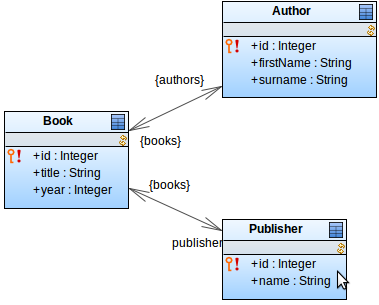
def Author heller := new Author(firstName -> "Joseph", surname -> "Heller");
def Author vonnegut := new Author(firstName -> "Kurt", surname -> "Vonnegut");
def Author kerouac := new Author(firstName -> "Jack", surname -> "Kerouac");

def Publisher sas := new Publisher(name -> "Simon & Schuster");
def Publisher p := new Publisher(name -> "Putnam");
def Publisher dp := new Publisher(name -> "Delacorte Press");
def Publisher vp := new Publisher(name -> "Viking Press");

new Book(year -> 1961, title -> "Catch 22", authors -> {heller}, publisher -> sas);
new Book(year -> 1988, title -> "Picture This", authors -> {heller}, publisher -> p);
new Book(year -> 1973, title -> "Breakfast of Champions", authors -> {vonnegut}, publisher -> dp);
new Book(year -> 1969, title -> "Slaughterhouse-Five", authors -> {vonnegut}, publisher -> dp);
new Book(year -> 1957, title -> "On the Road", authors -> {kerouac}, publisher -> vp);
Run the module.
The quickest way to test your models is to do the development testing on the PDS Embedded Server: click  to start it and connect PDS to the server, and then right-click the module and go to Run As > Model to upload the module and create its model instance.
We will create a Grid over the shared Records that will display values of the Record fields:
EntityGridAuthorAuthor.id, Author.firstName, and Author.surname property paths. Also select the Editable flag on each column.If you have not done so yet, run PDS Embedded Server by clicking , right-click the form and go to Run As > Form Preview: this will open a preview of the form in your browser.
Now we are facing the following problem: the Grid is static and it will always display only Authors and the user cannot change this. You need to allow the user to change the type of entity that is displayed in the grid and when they select an entity, you need to update the content of the Grid. And not only the content: you need to actually update which Columns are displayed. To achieve this, we will use the dynamic features of the forms.
currentEntity of type Type<Record> that will hold the entity the user selects.currentEntity.Run preview of the form: right-click the form and go to Run As > Form Preview. The preview will fail with a runtime exception since the currentEntity variable is null.
The first solution that comes to mind is to initialize the variable from a component higher in the hierarchy, in our case, the vertical layout component, during form initialization: However, this will result in the same exception because these expressions are executed after the form tree is initialized. You can check this in the form expression (right-click into the form and select Display Widget Expression). Hence we need to initialize the variable sooner: you can do so in a form constructor:
   public EntityOverview(){
     currentEntity := type(Author);
   }
  //get a list of properties of the entity in the currentEntity variable:
  def List<Property> properties := currentEntity.getProperties();

  foreach Property p in properties do
     def forms::GridColumn col := c.addColumn(new PropertyPathValueProvider(p));
  end
def List<Property> properties := currentEntity.getProperties();

foreach Property p in properties do
//exclude properties with Records or Collections:
   if !(
        p.getPropertyType().isSubtypeOf(type(Record)) ||
        p.getPropertyType().isSubtypeOf(type(Collection<Object>))
        )
   then
      def forms::GridColumn col := c.addColumn(new PropertyPathValueProvider(p), null,
          //Boolean sortable:
          null,
          // Boolean editable:
          true,
          // Editor editor:
          null);
   end
end
Provide the user a component that will change the value of the currentEntity:
options of type Map<Object, String> and initialize it from the constructor: EntityOverview {
public entityOverview(){
currentEntity := type(Author);
//added initialization of options:
options := [Author -> "Author", Book -> "Book", Publisher -> "Publisher"];
}
}
¤tEntityoptions c.setOnChangeListener({ e ->
//remove all columns:
foreach forms::GridColumn c in EntityGrid.getColumns() do
c.remove()
end;
//update the type data source of the grid:
EntityGrid.setDataSource(new forms::TypeDataSource(currentEntity));
//get list of properties of the entity record:
def List<Property> properties := currentEntity.getProperties();
//create colums for properties in the grid:
foreach Property p in properties do
if !(
p.getPropertyType().isSubtypeOf(type(Record)) ||
p.getPropertyType().isSubtypeOf(type(Collection<Object>))
)
then
def forms::GridColumn col := EntityGrid.addColumn(new PropertyPathValueProvider(p));
end
end;
} );
c.setNullSelectionAllowed(false);
@ExtensionMethod

public Grid getGridWithColumns(Grid g, Type<Record> currentEntity) {

  def List<Property> properties := currentEntity.getProperties();

    properties.compact().collect(
      { p ->
         if !(p.getPropertyType().isSubtypeOf(type(Record)) ||
           p.getPropertyType().isSubtypeOf(type(Collection<Object>)))
         then
           g.addColumn(new PropertyPathValueProvider(p), null,
             //Boolean sortable:
             true,
             // Boolean editable:
             true,
             // Editor editor:
            null)
         end
        }
    );
  g;
}
Adapt the assembly of columns on grid to EntityGrid.getGridWithColumns(currentEntity).
EntityGrid.addButtonColumn("Delete", { e:Record -> deleteRecords({e}); EntityGrid.refresh()});. If you have not, you will need to add it to the code that creates the columns in the Single-Select component and to the Init code of the Grid.setHeader(core::getLabel(p)) call to the generated columns. If you have not, you will need to add it to the code that creates the columns in the Single-Select component and to the Init code of the Grid. public Grid getGridWithColumns(Grid g, Type<Record> currentEntity) {
def List<Property> properties := currentEntity.getProperties();
properties.compact().collect(
{ p -> if !(p.getPropertyType().isSubtypeOf(type(Record)) ||
p.getPropertyType().isSubtypeOf(type(Collection<Object>)))
then
g.addColumn(new PropertyPathValueProvider(p), null,
//Boolean sortable:
true,
// Boolean editable:
true,
// Editor editor:
null)
//adding header to each column:
.setHeader(core::getLabel(p));
end
}
);
g.addButtonColumn("Delete", { e:Record -> deleteRecords({e}); g.refresh()});
g
}
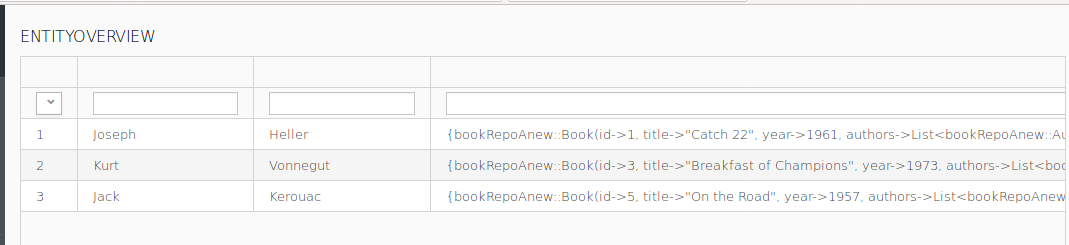
In the preview, you can spot that the Single-Select List and the Grid have empty space below: their size does not get adapted to their content.
To fix this, set the number of rows to the number of displayed items:
c.setRows(options.size());
...
   g.addButtonColumn("Delete", { e:Record -> deleteRecords({e}); g.refresh()});
   g.setHeightByRows(countAll(currentEntity));
   g
}
...
If you need to adjust the presentation further, such as, adding margin, consider using CSS or JavaScript.
The final step is to create a page with the form: a page is represented by a document definition. When you upload a document definition, it is included in the list of documents, which are accessible from the Application User Interface. For more information on documents, refer to Documents-related documentation.
To define a new document, do the following:
new EntityOverview()