LSPS Documentation
Every company works with data that have some structure. Let's take invoices for example: as a bare minimum they have an ID number and a date. The rest of the data is where it gets more complicated: the bill-to data and the list of purchased items consitute further data structures, which engage in mutual relationships. Such data structures are reflected as custom complex data types, called Records.
This chapter provides only a brief introduction into data types and data type modeling. Note that to create both sophisticated and efficient data models, you will need more than being able to work with LSPS: make sure to analyze your data model properly before you design it to prevent performance and maintenance issues in the future. More detailed information on data types is available in the Data Type Model section of the GO-BPMN Modeling Guide.
You will create a very simple data type model for invoicing:
First you need to create a data type definition. This is a file that will hold the data type model. Since the data type model will be used by the entire application, we will create it in the common module:
Right-click the common nodule and go to New > Data Type Definition. Click Finish in the popup.
Note that you can have your data model in multiple data type definitions and they will be still considered one data model. Therefore, your Records have to have different names even if they are in different files: What "separates" your data models is a module (the namespace is defined by the name of the module), not files.
You can see the definition file in the GO-BPMN Explorer. It is opened in the data-model editor: the white empty space in the editor area is the file's diagram, which is a visualization unit: it displays the content or part of the content of the file. The complete content is in the Outline view. You will get back to diagrams later.

Let's rethink our BillTo Record: you could charge a company or a person; a company will not need a surname and a person will not need headquarters data. However, they are still considered the charged parties: to retain this structure, let's create child Records that will allow you to distinguish between them.
Add the id field to the BillTo record and create the child Records NaturalPerson and LegalPerson of the BillTo Record.
With a bit of luck you have now a model similar to this one:

And there we have another problem: we do not want to create a BillTo record ever again: we want to charge always a natural or legal person. Hence, BillTo must be abstract: in the Properties of the Record select the Abstract flag.
Now, the assignment of an invoice to John is no longer valid: John must become a NaturalPerson.
john := new NaturalPerson (
  name > "John",
  surname > "Doe",
  invoices > {currentInvoice_1, currentInvoice_2}
)
For further details on inheritance, refer to the official documentation
As we have mentioned above, Records are similar to classes in object-oriented programming. As such, they can define methods.
Let's define methods for NaturalPerson:
The assignment expression will now return john's name.
Now define the following methods for the abstract BillTo record:
BillTo {
   public Integer getId(){
     this.id
   }
   private void setId(Integer id){
     this.id := id;
   }
}
You can now perform the call john.getId() which will use the getId() method defined on the BillTo record. However, if you try to call the setId(), which is a private method on the abstract BillTo record, you will get a validation error.
Right now all the data on invoicing gets trashed right after the model instance finishes. To persists the data so they remain available after the instance finishes, change the records to shared records: an instance of a shared record is stored immediately in the database. Any operation on the data of the record instance is performed on the persisted data. The same is true for record relationships.
Mark all Record as Shared in their properties:
You got a bunch of errors saying Shared record <NAME> must specify at least one primary key: That is because each shared record represents a database table and each record field represents a column in that table, for example, record Car with fields make and license plate is stored in table Car with columns make and license plate. Whenever you create an instance of a shared record, a row with the data is added to the table. To be able to find a particular record instance (row), you need to specify something that identifies it; in the example it is the license plate of the car: This unique property is the primary key.
The records already contain such properties, the number and id properties. All you need to do is mark them as primary keys. Also so you don't have to enter the primary-key manually everytime you are creating a record instance, set it to generated the primary keys automatically:
Note that the BillTo Record has an additional database property O-R inheritance mapping. Its default setting is Each record to own table. Let's take a look at what that means:
Open a database client, such as SQuirreL or DBeaver, and check the schema of the Record tables.
On Designer Embedded Server, connect to //localhost/./h2/h2;MVCC=TRUE;LOCK_TIMEOUT=60000; for jdbc the URL will be jdbc:h2:tcp://localhost/./h2/h2;MVCC=TRUE;LOCK_TIMEOUT=60000. Both the name and password are lsps.
The tables for individual Records reflect the model: the BillTo table contains the id column only and the NaturalPerson table contains the id identical to the BillTo.id, surname, firstname, etc.
Let's test the other inheritance mapping:
The BILL_TO and INVOICE table now contain the entire hierarchy along with the TYPE_ID column which holds the record type of the entity, such as invoice-types' NaturalPerson: there are no tables for the NaturalPerson or LegalPerson records.
At some point, you might need to change the data model for your business data. Let's say you need to separate the details of the invoice from the rest of the Invoice record. You remove the dueDate field, create a new BasicData record with the dueDate field and create a relationship between the two. For the underlying database this means a change of the Invoice table. If you can delete the invoicing database, drop the database and upload the model so the tables are created anew. However, if you need to preserve the existing data, you need to migrate the existing data so they fit the new database schema. This is an advanced topic and is covered in the developer documentation and deployment instructions.
To allow an easy migration of database, consider using a tool for tracking of database schema changes, such as, Flyway or Liquibase.
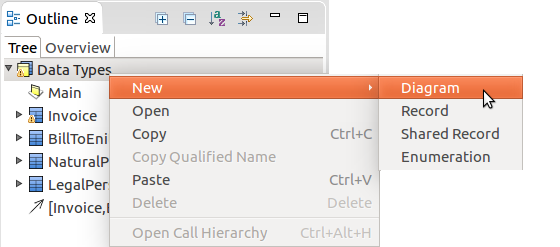
At this point, all elements of the data-type model are displayed in the default Main Diagram: When you insert a new element onto the canvas, two things happen: the element is created in the definition file and it is displayed in the Main diagram. One definition file can contain multiple diagrams and one element, such as a Record, can be displayed in the diagrams arbitrarily. It might not be displayed at all. To check the content of the definition file, look at the Outline view.

Create another diagram in the data-type definition file and display an existing Record in it:
For more information, refer to the Diagram chapter of the GO-BPMN Modeling Guide.
Create the interface Nameable with the getName() method; make the NaturalPerson and LegalPerson realize the interface.
