This chapter contains patterns with happy-flow examples.
Editable Table
Required result:
- Table with columns with editable values.
- One of the columns contains a drop-down list with the possible options. The options are based on an enumeration.
- The table values are persisted when you click the Submit button.

Resulting form
To create a document or a to-do with such a table, you need to do the following:
- Create the data type model with a shared record for the persisted entity and the enumeration.
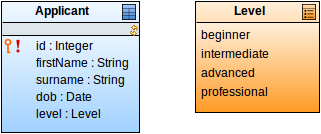
The underlying data type hierarchy
- Create the form definition.
- Create a form variable of the shared record type (Applicant): The table will use the variable as its iterator.
In the form, add the Table component and define its properties on the Detail tab:
- Set Data Iterator as the reference to the form variable.
- Set Data Kind.
- Define the Data expression.
In this pattern, we assume you are using the Data Kind set to Data with the Data expression defined as a closure with two input parameters:{x, y -> getAllApplicants()}
- In the table component, insert the Table Column components.
In the columns, add the Input components.

Asset table with columns with two text boxes and one combo box
In the example, we inserted two Text Boxes and one Combo Box:
- On Text Boxes, define the binding to the reference to the iterator fields, for example,
&i.surname.
- On the Combo Box component, define the binding to the iterator field and the options to be displayed in the drop-down area.
To bind options to the enumeration, convert the enumeration literals to options. You can do so using the collect() and literalToName() functions.
collect(literals(type(Level)),
{e -> new ui::Option(value -> e,
label -> literalToName(e))})
- Define the Submit button:
- Insert the Button component into the form.
- Create ActionListener on it.
- On the listener properties, select the Submit action on the Actions tab.
- Optionally, set the text that should be displayed in the table if it contains no entries: on the Presentation Hint tab of the table properties, add the
no-data-message hint.
- Create a document or a process with a to-do that uses the form.
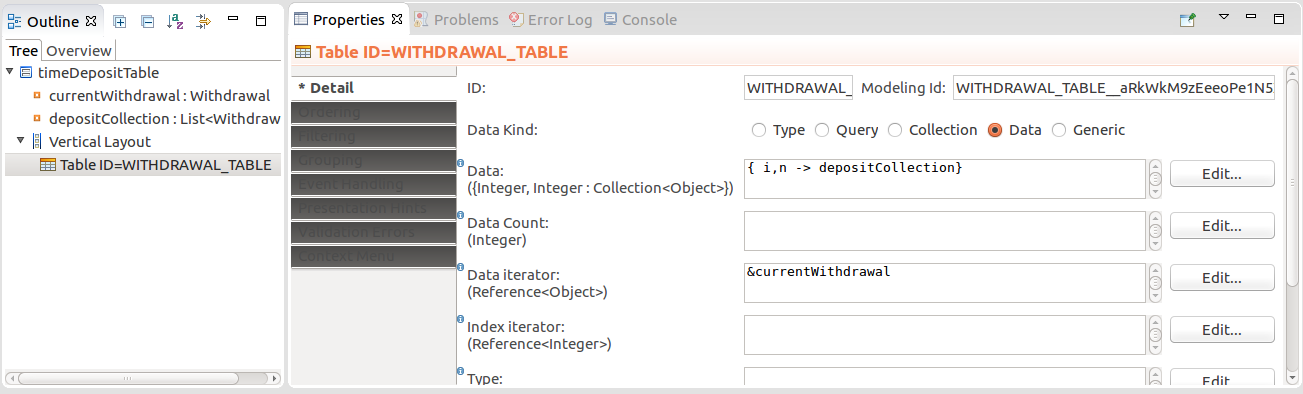
Table with Derived Values
Required result: A table with a column with a value derived from another column value: One column value is persisted; the derived value is transient. The column values depend on each other and adapt to each other when either is changed.

When you change Interest Rate, the Withdrawal Date changes. Withdrawal Date is not persisted.
- Create the underlying data type hierarchy with the base shared record and a non-shared record with fields for the derived values:
- Create or import the base shared record.
- Create a record with the derived field.
- Define an association between the records: the derived record is the target of the relationship.
Important: In such scenarios, you cannot use the supertyping mechanism since a shared record is involved:
- If you had a derived non-shared record that is the supertype of the base shared record, the derived record would include the fields of the base shared record but the shared record itself could not be recovered efficiently.
- If you decided to define the base shared record as the supertype of the wrapper non-shared record, whenever you decide to refresh the table with the record data, new shared record instances would be created and written in the database.
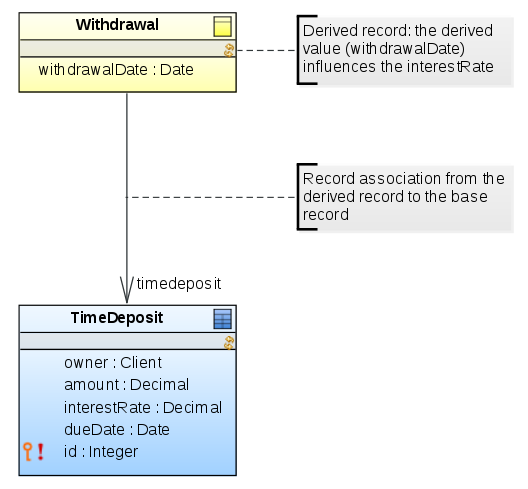
Base shared record TimeDeposit associated with the derived non-shared record Withdrawal
Create the form definition.
Create a local variable of the derived record type.
The variable will serve as the iterator variable for the table.
- Create a local variable of the collection type with the derived records (for example, List<Withdrawal>), and initialize it so it holds the available Withdrawal object, for example, with the
collect() function.
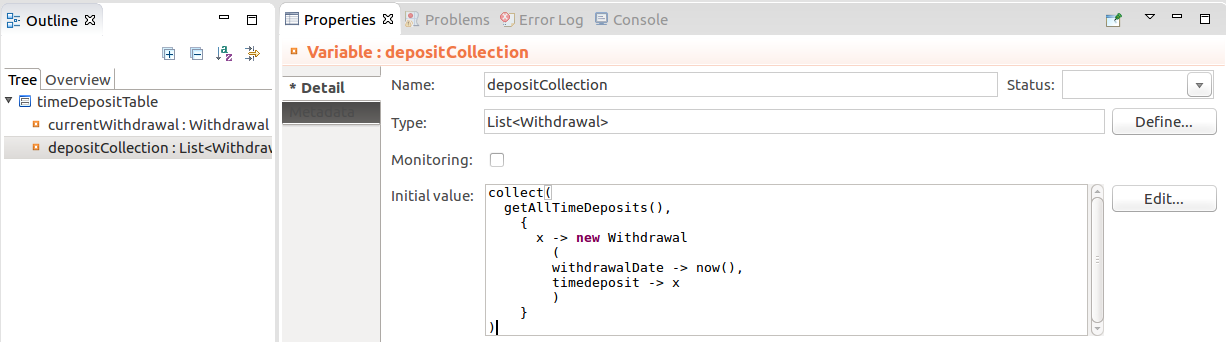
The collection form variable with the initial value
- In the form, insert the Table component and define its properties:
- Data Kind as Data
- Data as a closure that returns the local variable with data.
- Data Iterator as reference to the iterator variable
- In the table component, insert Table Column components and input components as their child components: define their ID and the binding of the input components to the respective field of the iteration variable (in the example,
¤tWithdrawal.timedeposit.interestRate and ¤tWithdrawal.withdrawalDate).
- On each input component define the following:
- Create ValueChangeListeners: as the component to refresh, define the other input component and as Handle expression, define the new value of the iterator field, for example, using a function. Do not define the column as the component to be refreshed. Columns do not support the refresh action.
currentWithdrawal.withdrawalDate:= countWithdrawalDate(currentWithdrawal.timedeposit.interest)
- Set the Immediate property to
true otherwise change of a value will not trigger change of the other value: the change would take place only after another event triggers the processing.
When set to true, the value changes are processed whenever the user clicks out of the input component or presses Enter.
- Create a document or a process with a to-do that uses the form.
Calendar with Adding Entries Functionality
Required result: Form with a calendar into which you can add entries by selecting days in the calendar: entries details are defined in a pop-up dialog.
Do the following:
- Create or import the shared record for your calendar entries.
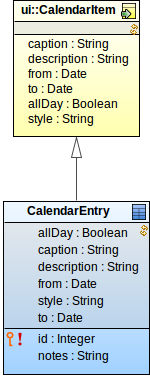
Shared record for calendar entries derived from the CalendarItem record
- Create a form definition, open it and insert a Vertical Layout component.
Create a local variable of the calendar entry type.
The variable will hold the data about a new calendar entry. For the example above, the variable will be of the CalendarEntry type.
- Create the calendar:
- Insert the Calendar component into the vertical layout.

Vertical layout with calendar component
- Define the properties of the calendar:
- Data: closure that returns all calendar entries (The closure is called on calendar initialization and refresh: After you add a new calendar entry to the database, the calendar needs to be refreshed so as to load and render the new calendar entry.)
{ a, b -> (toSet(findAll(type(CustomCalendarItem)))) }
- To item: transformation of the data object to CalendarItem so the Calendar component knows how to display them; in this case, transformation of the CalendarEntry to ui::CalendarItem.
{ calItem:CalendarEntry -> new CalendarItem(caption -> calItem.caption, description -> calItem.description, from -> calItem.from, to -> calItem.to, allDay -> calItem.allDay, style -> calItem.style)}
- Create the popup:
- In the form, insert the pop-up component and define its properties:
- Nest the pop-up component in a View Model: right-click the popup and selects Insert Parent > View Model. Define its ID.
Note: The view model component isolates the data in the pop-up component from the data in the form context: it creates an evaluation context over the screen context. You will initialize the calendar entry variable when the pop-up is displayed and get the dates the user selects in the pop-up, all this will take place in the new evaluation context.
If you don't nest the pop-up in a view model component, the initialization of the variable will create a shared record with incomplete data in the screen context. When nested in the view model, the data is written into the screen context only after it is submitted or persisted by a listener.
- Create the content of the popup: insert the Form Layout component and into it input components so the user to provide the other details for the CalendarEntry. Make sure the input components are bound to the correct field of the
CalendarEntry variable.
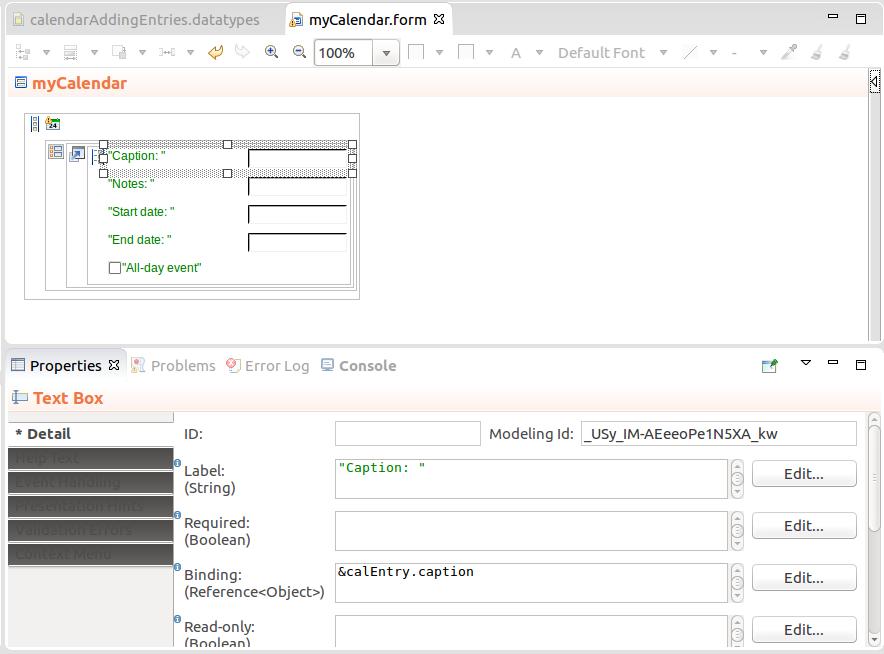
Calendar form
- On the calendar component, create a CalendarCreateListener that will display the popup with the selected dates, when the user selects a time period by clicking and dragging:
- Set its visibility to true and refresh it:
- On the Basic tab, enter the pop-up ID as the Refresh components value.
- On the Basic tab, define the handle expression so it sets the variable with the pop-up visibility to true.
- Initialize calendar entry with the clicked dates: on the Basic tab, in the Handle expression, extract the dates from the event into the CalendarEntry variable:
calEntry:=new CalendarEntry(
from -> _event.from,
to -> _event.to
)
- Define the submit button in the pop-up that will persist the provided data and close the pop-up:
- In the pop-up component of the form, insert the button component and define its properties.
- Create the ActionListener on the button with the following:
- Handle expression hides the pop-up.
- Refresh the pop-up and the calendar.
- Merge the view model (On the Advanced tab, enter the ID of the view model in the Merge view model components property)
- Persist to save the new event in the database so it is picked up by the
findAll() call on calendar refresh.
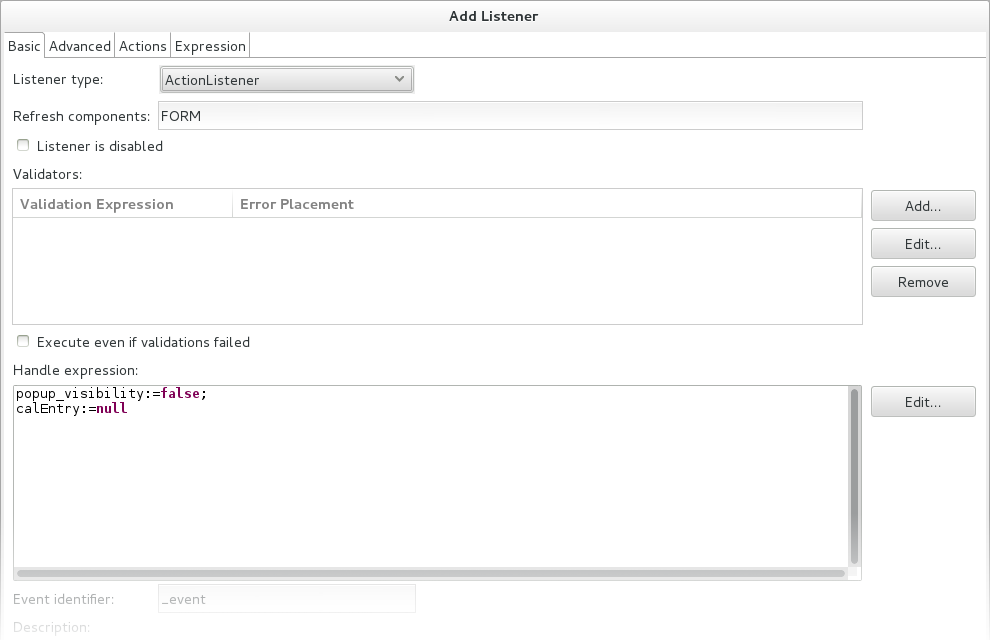
Listener on the submit button
Pop-up with Save and Cancel Buttons
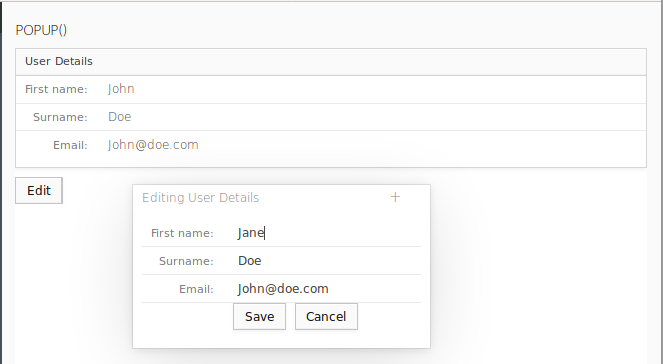
Required result: When you click a button in your form, a popup where you can edit the form data is displayed. The pop-up contains an Save and a Cancel button. When you click the Save button, the data in the pop-up is applied to the data in the form and the pop-up closes. When you click Cancel, the data in the pop-up is discarded and the pop-up closes.
To create a pop-up window with a Save and Cancel button, do the following:
Open the form with the data you want to edit in the popup.
In the example, the data already exists and is stored in a form variable. If you want to create new data from the popup, make sure to initialize the data in the View Model we create in the next step.
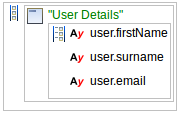
Form with user details
Insert the View Model component into the form and define its ID.
The view model creates a context on an overlay execution level: this context will hold the differences to the form context on the screen level and will allow us to discard or save the differences in one step by clicking a button (for more details on how it works, refer to View Model Component).
Insert the Popup component into the View Model component.
If you plan to create a complex component tree in the popup, consider using the dynamic popup to prevent performance issues: with dynamic popup the form is calculated and populated only when the popup is created, while the modeled popup is created when the form is initialized.
- Set up the popup displaying:
- Create a Boolean local variable with the initial value to
false and set the variable as value in the Visible property of the popup.
- Create the logic that will open the popup, for example, insert a Button with an ActionListener that sets the visibility variable to true and refreshes the popup.

Setting Popup visibility for the *Save* button click
Create the popup content:
- Insert a layout component and input components into the Popup component.
- Bind input components to the local variable and define the labels.
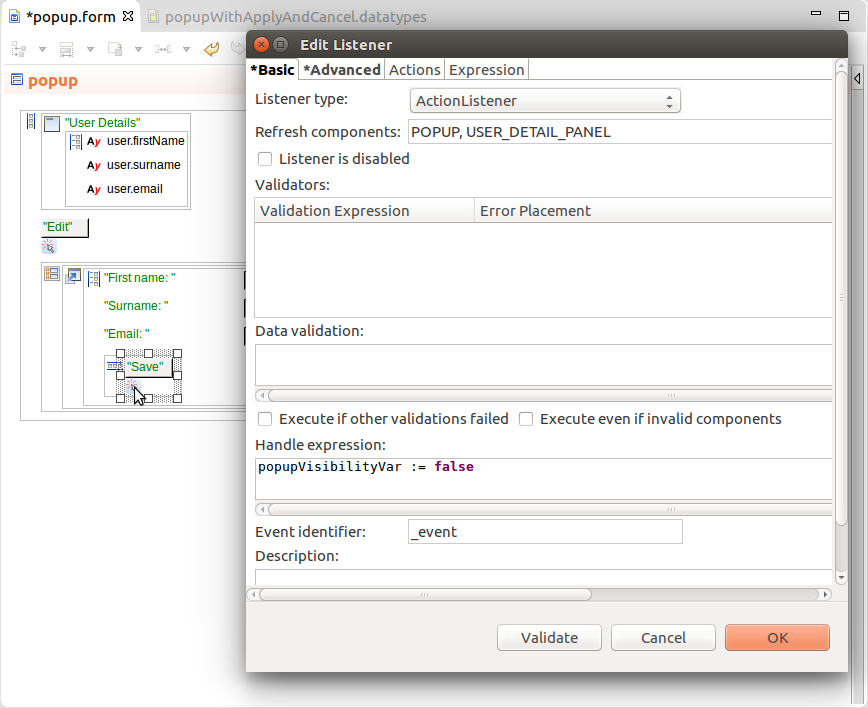
- Insert the Button component for the Save button and attach to it an ActionListener that will execute the following:
- Merge the changed data to the form context: On the Advanced tab in the Merge view model components property, insert the ID of your view model.
- Close the popup: on the Basic tab in the Handle expression, set the popup visibility to
false and in the Refresh components, insert the ID of the popup component.
- Refresh the data in the form (outside of the view model): in the Refresh components, insert the IDs of the components.
- Insert the Button component for the Cancel button and attach to it an ActionListener that will execute the following:
- Close the popup: on the Basic tab in the Handle expression, set the popup visibility to
false and in the Refresh components, insert the ID of the popup component.
- Discard the changes in the View Model: On the Advanced tab in the Clear view model components property, enter the name of your view model.
- Set the listener to execute in the form context: On the Advanced tab, set the Execution context property to Top level.
If left set to default, the listener would execute in the execution context created by the view model. Since we are discarding the data from the view model, the visibility setting would be discarded as well and the popup would remain open.

Setting cancel as View Model action for the Cancel button click
- Run the Form Preview and check the functionality.