LSPS Documentation
In the previous chapters, you uploaded your modules to Designer Embedded Server. This is an application server with the LSPS Application already deployed.
In real-world scenarios, such a solution is obviously not sufficient since it is not possible to customize the LSPS Application User Interface or add new business logic to the application.
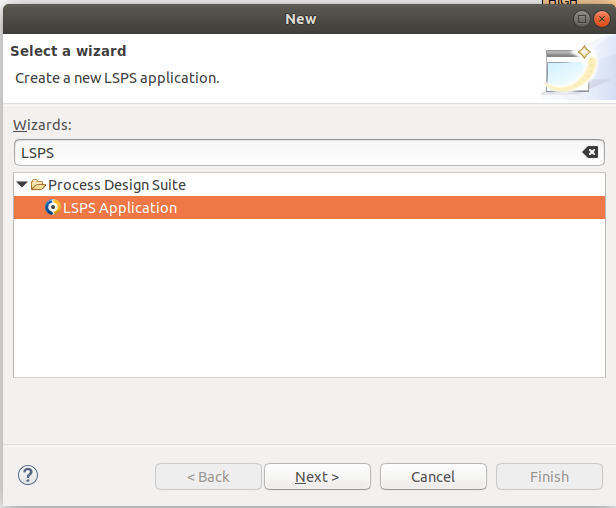
To perform such customizations, you need the LSPS Repository delivered as a separate file. With the repository set up, you can generate the Application User Interface source and LSPS Application sources with their API, so you can modify the application:
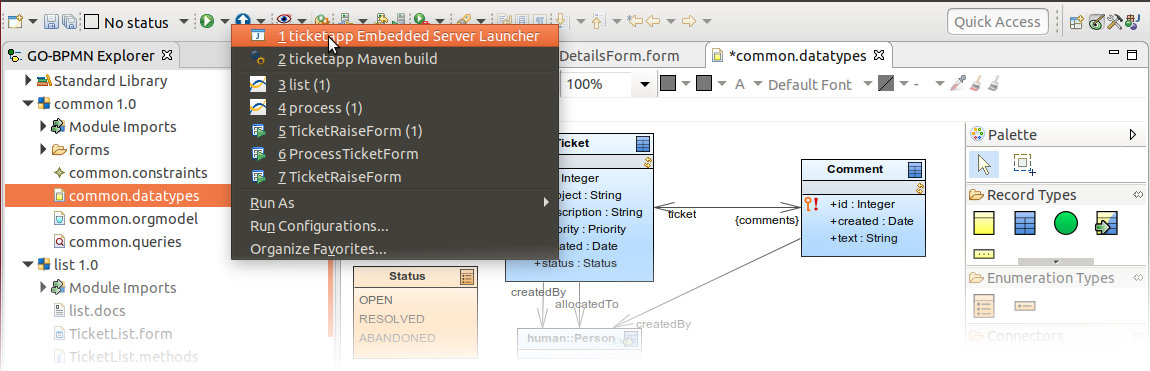
Wait until the notification popup appears.
Note that Designer generates not only the application but also an embedded server and related resources.
For directories with GO-BPMN projects, make sure to add the .project directories to version control since these are not generated by maven: If using git, add !.project to .gitignore in the directories.
Local git repo setup
ticketapp-embedded project: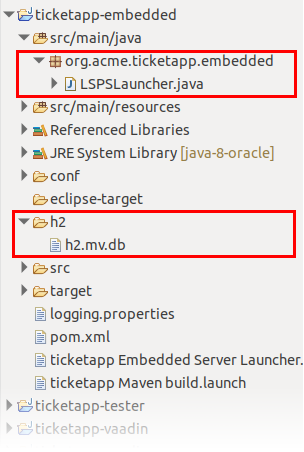
localhost:8080/lsps-application/ui, you will access the LSPS Application of the SDK Embedded Server you have just started up.User story: In the Application User Interface, users can access from their navigation menu only the documents they have access to and the to-do list.
Create your implementation of the menu:
core package of the <YOUR_APP>-vaadin project, create the AppMainMenu class that extends DefaultMainMenu.getNavigator() method to allow integration with View switching.addRunModelMenuItem(navigationMenu) and addDocumentsMenuItem(navigationMenu) calls.adddDocumentMenuItem().AppAppLayout.createMainMenu() method return AppMainMenu.
  @Override
  protected Component createMainMenu() {
    return new AppMainMenu(CONTENT_AREA_ID);
}raising and list modulesAppMainMenu class
public class AppMainMenu extends DefaultMainMenu {

  public AppMainMenu(String closeOnTapAreaId) {
    super(closeOnTapAreaId);
  }

  private AppNavigator getNavigator() {
    LspsUI ui = (LspsUI) UI.getCurrent();
    return ui.getNavigator();
  }

  @Override
  protected NavigationMenu createMenu() {
    NavigationMenu navigationMenu = new NavigationMenu(createUserMenu());

    LspsUI ui = (LspsUI) UI.getCurrent();
    UserInfo user = ui.getUser();

    if (user.hasRight(HumanRights.READ_ALL_TODO) || user.hasRight(HumanRights.READ_OWN_TODO)) {
      addTodoListMenuItem(navigationMenu);
    }
    if (hasRightToOpenDocument("raising::raiseTicketDoc")) {
      navigationMenu.addDocumentItem("New Ticket", "raising::raiseTicketDoc", null, VaadinIcons.AMBULANCE, null);
    }
    if (hasRightToOpenDocument("list::ticketListDoc")) {
      navigationMenu.addDocumentItem("My Tickets", "list::ticketListDoc", null, VaadinIcons.CLIPBOARD_CHECK, null);
    }

    return navigationMenu;
  }
}??? characters: these signalize that the system failed to find the localization string. Let's create the string:...
if (hasRightToOpenDocument("raising::raiseTicketDoc")) {
navigationMenu.addDocumentItem("nav.newticket", "raising::raiseTicketDoc", null, VaadinIcons.AMBULANCE, null);
}
if (hasRightToOpenDocument("list::raiseTicketDoc")) {
navigationMenu.addDocumentItem("nav.usertickets", "list::ticketListDoc", null, VaadinIcons.CLIPBOARD_CHECK, null);
}...com.whitestein.lsps.vaadin.webapp package (<YOUR_APP>-vaadin project), for example, the localization.properties file with the default localizations.h2 directory in the embedded project. 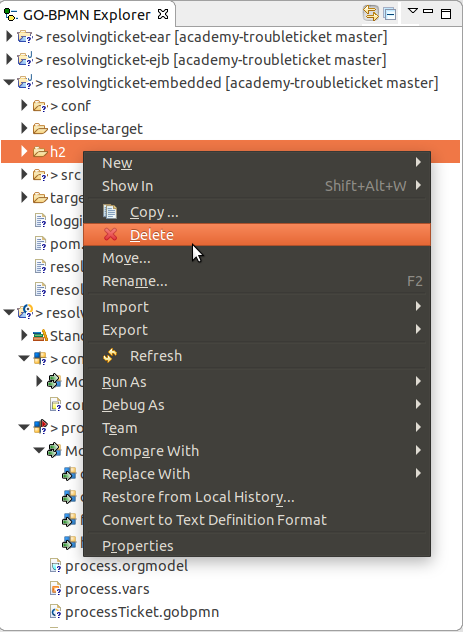
User story: The Application User Interface follows the black-and-white color schema.
You can switch between the available style themes on the Settings page: click Settings in your profile menu to navigate to the page. By default the lsps-valo is used. You will use this theme as base for a customized theme; you can pick the dark or blue theme if it is closer to the look you want to achieve.
vaadin-war project. 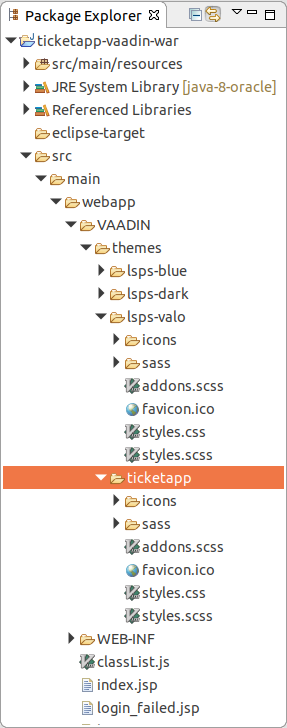
  .ticketapp {
  @include addons;
  @include lsps-valo-base;
  @include theme-app;
}getThemeManager() method: @Override
protected ThemeManager getThemeManager() {
ImmutableSet<String> themes = ImmutableSet.of("lsps-dark", "lsps-valo", "lsps-blue", "ticketapp");
return new ThemeManager("ticketapp", themes);
}localhost:8080/lsps-application and log in to make sure that the theme has been loaded successfully.src/main/webapp/VAADIN/themes/ticketapp/styles.scss
src/main/webapp/VAADIN/themes/ticketapp/styles.cssticketapp-vaadin-war/src/main/webapp/WEB-INF/web.xml to false.ticketapp-vaadin-war/src/main/webapp/VAADIN/themes/ticketapp/sass/_variables.scss, edit or add the theme properties:
$valo-menu-background-color:  hsl(210, 0%, 98%);
$v-background-color: hsl(210, 0%, 98%);
$v-focus-color: #adadad;
User story: Login and logout pages follow the style.
ticketapp-vaadin-war/src/main/webapp/login.jsp.<title>Trouble Ticket Application</title>.ticketapp-vaadin-war/src/main/webapp/VAADIN/themes/ticketapp/sass, create *_login.scss* with the rules for the login page: @mixin _login {
&.login-page #loginHeader {
background-color: white !important;
background-image: url("../img/logo_splash.png") !important;
background-position: center bottom;
background-repeat: no-repeat;
background-size: 300px auto;
}
&.login-page form table {
background-color: white;
background-image: none;
}
&.login-page input{
border: 1px solid #c9c9c9;;
}
&.login-page .v-button .v-button-caption {
color: #c9c9c9 !important;
}
}@import "sass/_variables";
//added:
@import "sass/_login";
...
.ticketapp {
@include addons;
@include lsps-valo-base;
@include theme-app;
//added:
@include _login;
}
To remove logo located in the upper-left corner, you need to remove TopBanner from NavigationMenu:
AppNavigationMenu that extends NavigationMenu.createTopBanner() method.
 public class AppNavigationMenu extends NavigationMenu {

  public AppNavigationMenu(Component userSubmenu) {
    super(userSubmenu);
  }

  //this removes the logo slot:
  @Override
  protected Component createTopBanner() {
    return null;
  }
}AppNavigationMenu instead of the default NavigationMenu:
...
  @Override
  protected NavigationMenu createMenu() {
    //changed NavigationMenu to AppNavigationMenu:
    NavigationMenu navigationMenu = new AppNavigationMenu(createUserMenu());
User story: Users can export the details of a ticket to a PDF from ticket details.
There is no support for PDF export out-of-the-box: You will use the Apache pdfbox to implement a custom function for PDF-export.
<WORKSPACE>/ticketappfile
...
      <dependency>
        <groupId>com.whitestein.lsps.monitoring</groupId>
        <artifactId>lsps-monitoring-client</artifactId>
        <version>${lsps.version}</version>
      </dependency>
      <!-- Added: -->
      <dependency>
        <groupId>org.apache.pdfbox</groupId>
        <artifactId>pdfbox</artifactId>
        <version>2.0.12</version>
      </dependency>
...
        <artifactId>lsps-os-exec</artifactId>
        <scope>provided</scope>
      </dependency>
      <!-- Added: -->
      <dependency>
        <groupId>org.apache.pdfbox</groupId>
        <artifactId>pdfbox</artifactId>
      </dependency>
...
public void exportTicketToPdf(Ticket t)
  native org.acme.ticketapp.pdf.PdfExporter.exportTicketToPdf;
PdfExporter class.Implement the exportTicketToPdf(ExecutionContext ctx, RecordHolder ticket) method.
Example demo implementation of the PdfExporter class:
public class PdfExporter {

  private PDPage myPage = new PDPage();
  private PDDocument doc = new PDDocument();
  private PDPageContentStream content;

  public void exportTicketToPdf(ExecutionContext ctx, RecordHolder ticket) {

    SetHolder coms = (SetHolder) ticket.getProperty("comments");

    String title = ticket.getProperty("id") +
        (String) ticket.getProperty("subject") +
        ticket.getProperty("created");

    try {
      content = new PDPageContentStream(doc, myPage);
      doc.addPage(myPage);

      content.setFont(PDType1Font.TIMES_ROMAN, 12);
      content.setLeading(14.5f);

      printTitle(title);
      printComments(coms);

      content.close();

      doc.save("ticket.pdf");
      doc.close();

      Desktop.getDesktop().open(new File("ticket.pdf"));
    } catch (IOException e) {
      throw new RuntimeException("PDF export failed", e);
    }

  }

  private void printTitle(String title) throws IOException {
    content.beginText();
    content.newLineAtOffset(25, 700);
    content.showText(title);
    content.endText();
  }

  private void printComments(SetHolder comments) throws IOException {

    int y = 680;
    for (Object commentRecordHolder : comments) {
      String commentText = (String) ((RecordHolder) commentRecordHolder).getProperty("text");
      Date commentDate = (Date) ((RecordHolder) commentRecordHolder).getProperty("created");
      RecordHolder author = (RecordHolder) ((RecordHolder) commentRecordHolder).getProperty("createdBy");

      content.beginText();
      content.newLine();
      content.newLineAtOffset(25, y);
      content.showText(commentText + " on " + commentDate + " by " + author.getProperty("name"));
      content.endText();

      y -= 20;
    }
  }
}
Note the following:
getProperty() call.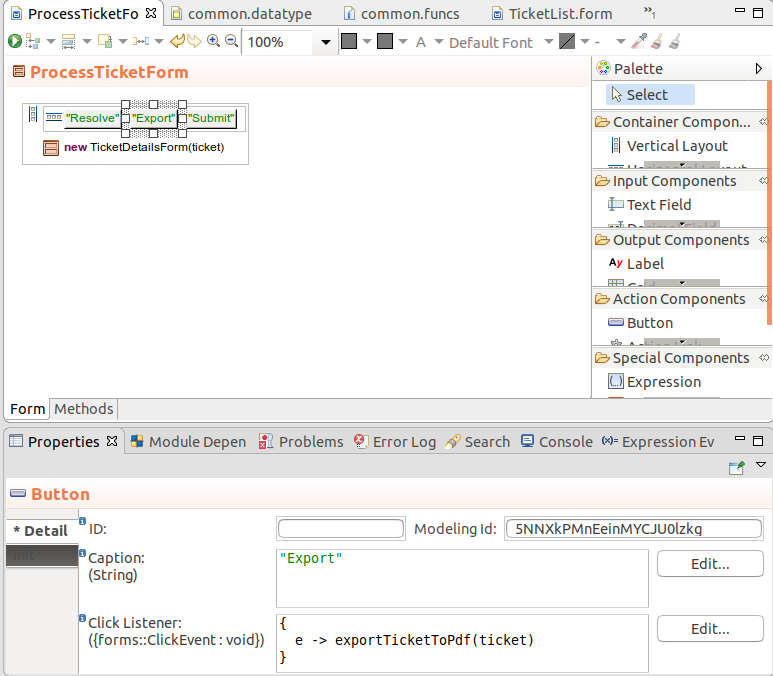
Further information and instructions on how to customize LSPS Application are available in the Development Guide and in Javadoc.
Consider taking a look at tutorials.