This series of simple tutorials demonstrate how to update the model of running model instances.
Mind that updating models can be very complex: consider using another approach such as agile processes pattern to avoid the need for model update altogether.
Generally, model update is performed in as follows:
- Open Designer and connect to the LSPS Server.
- Import the original model into your workspace.
- Import or create the target model into your workspace.
- Define rules for the model update in the model-update definition.
- Run the model update with the model-update definition.
- Unload the modules that are no longer used.
Note: If you are updating Java implementations as well (this is the case when updating to a newer standard library or to a custom LSPS Application with new custom java implementations, consider suspending the model instances that use the resources that are modified. Then you can redeploy the LSPS Application EAR. Note that if you want to run according to both, the original and target models, your implementations must be backward compatible (in such a case it is not necessary to suspend the pertinent model instances).
This section contains examples of simple model updates with the following modifications in the target models:
Updating a Variable Value
Required action: Update a model instance so that a variable value changes to a value derived from its original value.
In the example update, we will introduce the following changes on global variables:
- A variable will be removed.
- A variable will have its value modified to a value derived from the removed variable.
- Design the source model with a process definition and a variable definition:
- Create a module with a global variable definition with the following variables:
varSet of type Set<String> with the initial value {"old value 1", "old value 2"}varString of type String with the initial value "42"
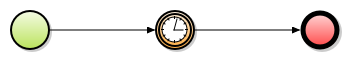
- Create a process definition with a None Start Event, a Conditional Intermediate Event, and a Simple End Event.
- Set the Condition parameter of the Conditional Intermediate Event to
false to keep the model instance running so it can be updated.
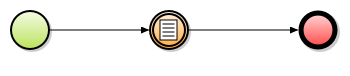
Process
- Design the target model:
- Copy and paste the old module.
- Modify the global variables
- Modify
varSet to have the initial value {"new value 1", "new value 2"}
- Delete
varString
- Create
varInt of type Integer with the initial value 1.
- Create the
.muc file:
- Right-click the parent project, go to New > Model Update Configuration and follow the instructions.
- Open the Variables page in the newly opened editor with your muc file
- Adjust the mapping if necessary: Map the new variable definition file to the old variable definition file and
varInt to varString. Mapping of VarSet should be recognized automatically after the variable definition file is mapped.
- Define the transformation expressions on the new variables:
varSet: {"transformation value"}varInt: toInteger(toString(old("varString")))
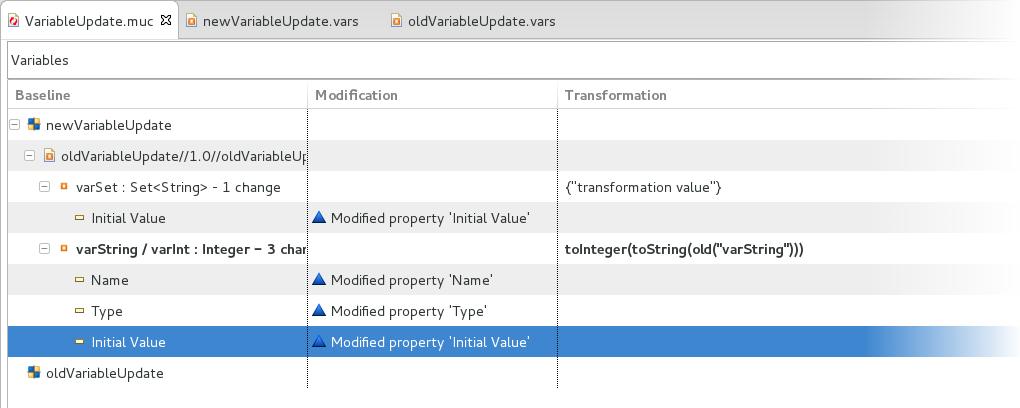
The muc file with variables and their transformation expressions
When you perform the model update, the system does the following:
- First attempts to transform variable values according to their transformation expression.
- If the expression does not exist, the system performs the transformation defined for the variable data type.
- If neither the variable transformation expression nor the data type transformation exist, the variable is initialized. This typically applies to variables that were added in the new model.
Note: When updating local variables of processes, sub-processes, and tasks, the update is determined by the update strategy of the parent element:
- If the strategy of the parent element is continue, the parent context is preserved. The execution continues in the old transformed context: Its local variables are transformed as defined by their transformation expression.
- If the strategy of the parent element is restart, the parent context is dropped and a new context is created: any local variables are discarded and new variables are initialized. The transformation expression on the variables is not applied.
To upload the resources and perform the model update, do the following:
- Make sure your server with the Execution Engine, possibly Designer or SDK Embedded Server, is running and your Designer is connected to it.
- Upload the model to the server and create its model instance: In the GO-BPMN Explorer, right-click the source module and go to Run As > Model.
- Upload the target model to the server: In the GO-BPMN Explorer right-click the module and go to Upload As > Model.
- Switch to the Management perspective.
- Refresh the Module Management and Model Instances view and check that both models are uploaded and the source model is instantiated.
- In the Model Instances view, open the detail of the source-model instance and check the values of the global variables.
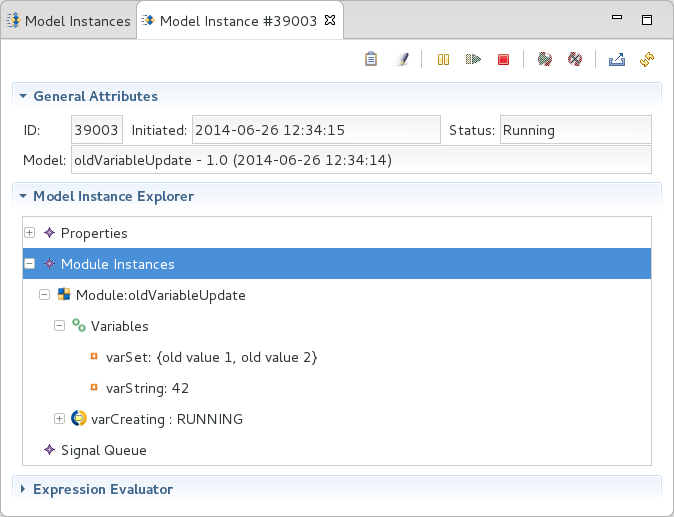
Detail of the old model with old global variables
- Perform the update:
- In the Model Instances view, click the Model Update (
 ).
).
- In the Model Update dialog window, provide the path to your muc file in the Configuration file field and click Next.
- In the refreshed dialog, check that the model instance is listed and selected in the Filtered Model Instances section and click Next. Check the summary of the model update and click Finish.
- Refresh the Model Instances view: The model instance should be in the Updated status.
- Display the detail of the model instance.
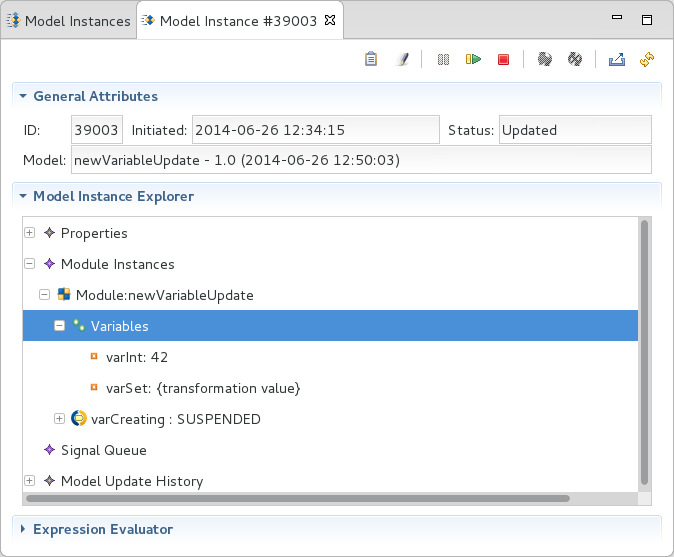
Detail View of the Updated Model Instance with New Global Variables
Note that the variables hold now the values defined by their transformation expression.
Updating a Task Parameter
Required action: Perform model update to a new model with modified task parameters and have a post process log the information about the update.
For this scenario, you should consider whether the task can be instantiated at the moment the model update is started or when the model instance is started after update:
- A task cannot be instantiated if it is atomic since it cannot be holding the token at that moment. Such tasks include the Log, Assign, Lock Task, etc. Changes on such tasks are considered as a removal of the old task and adding of a new task.
A task can be instantiated when its task type requires asynchronous or multi-step execution, or waits for an event. These are tasks that can hold an execution token and become a transaction border. Such task types include the User, HttpCall, Web Service Client, and Server Tasks of the Standard Library and possibly custom tasks.
For these tasks, you need to define their transformation strategy so that if such a task is running at the moment when you pause the process before the model update, or it will be running after the model instance starts after model update, the task is handled according to the transformation strategy. The strategy can be either restart or continue:
- If the strategy is set to restart, the task ignores its old context and restarts as a new task.
- If the strategy is set to continue, the task continues in its old context.
Let us update the Performers and Form parameter of a User Task. We will change the following:
We will consider the outcome of both the restart and continue strategy.
Proceed as follows:
- Design the old model as a module with a process and define its form definition with arbitrary content.

Old model
- Design the new model: Copy and paste the old module and modify the Performers parameter of the User Task and modify the content of its form definition.
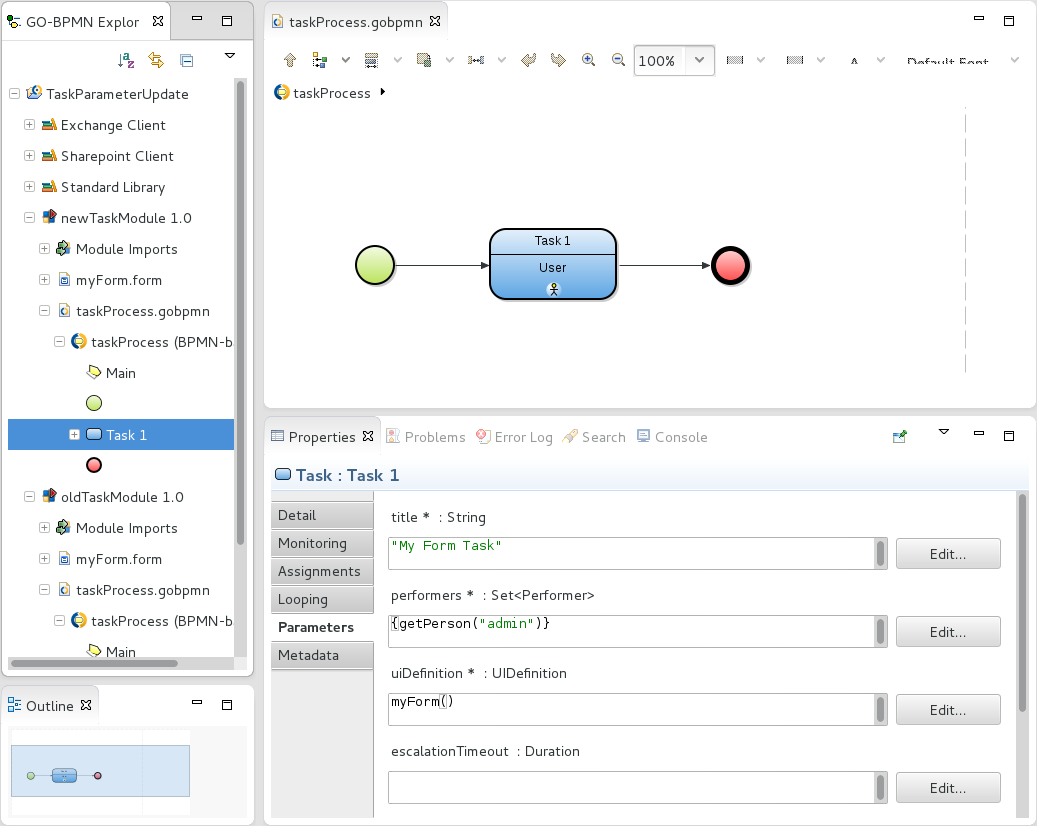
New model
- Create the
.muc file: Right-click the parent project, go to New > Model Update Configuration and follow the instructions.
- Open the
.muc file and on the Processes page locate the task parameter: The transformation strategy is set to Continue by default.
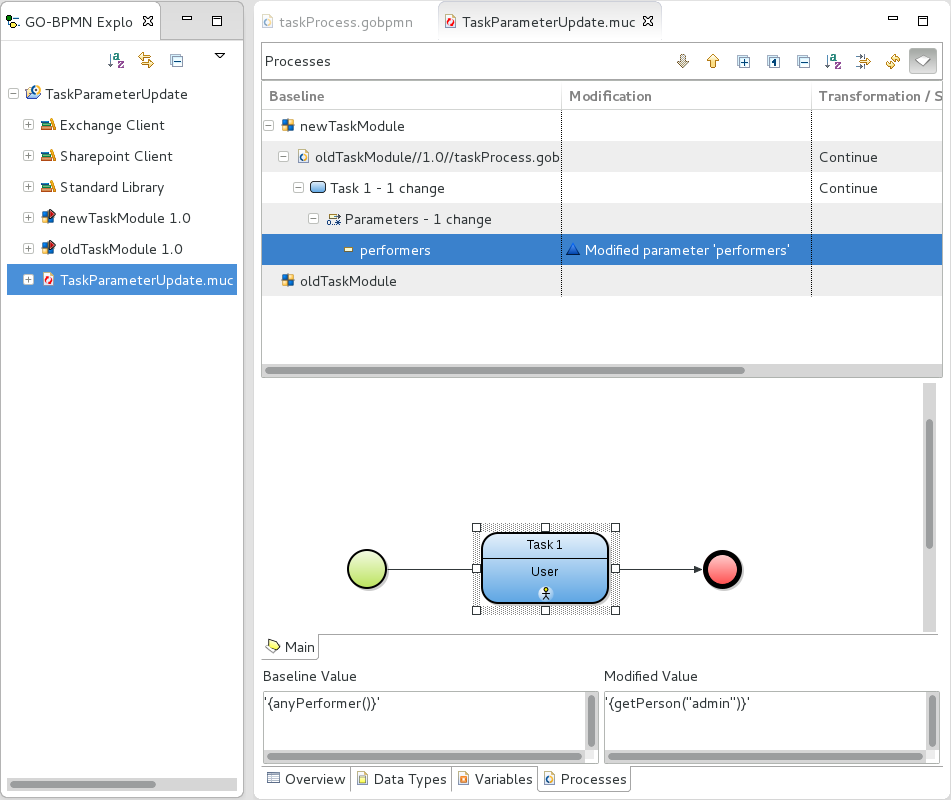
Model update configuration with the parameter change
Note that no changes on the form are detected since forms do not require any special handling on model update but are simply substituted with their new version.
- Define a post process on the module that will log a message:
- In the .muc file, right-click the new module and click Create Post-process.
- On the opened page, design the post process with a Log Task.
- Define the message parameter of the Log Task.
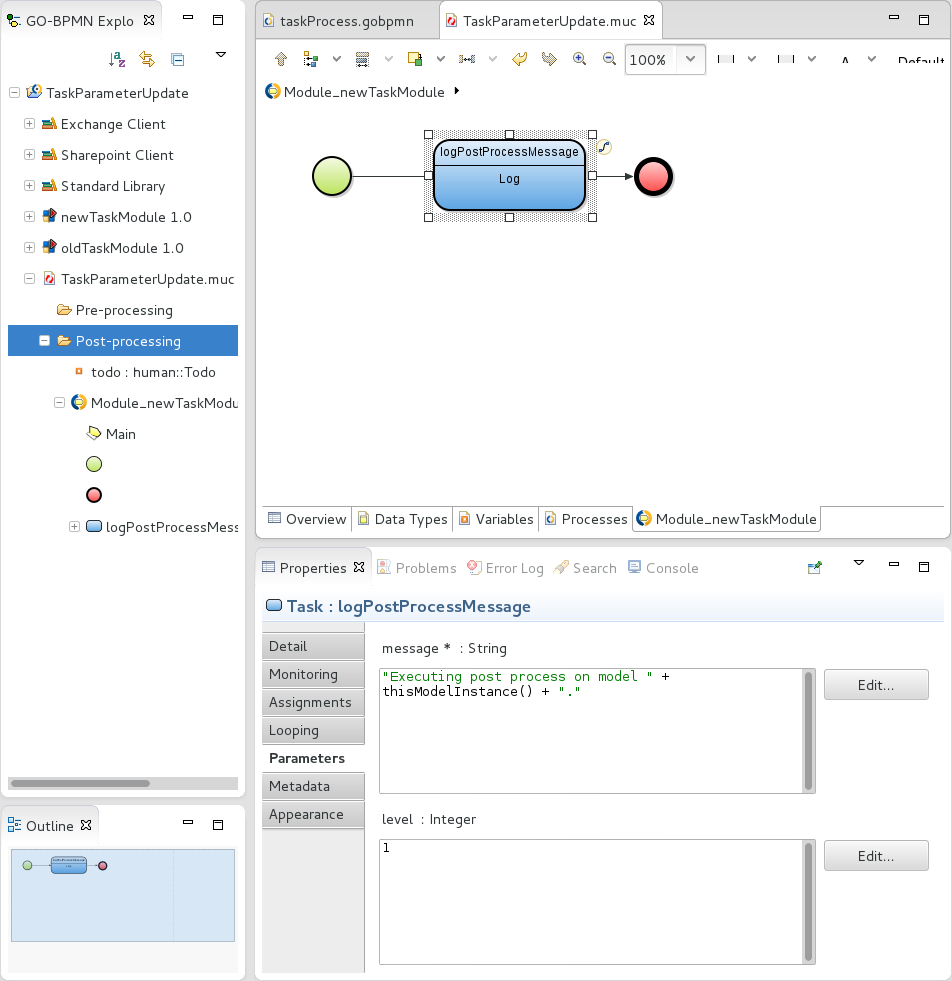
Post-Process
Make sure the transformation strategies on the module, process, and task of your muc file are set to Continue. This is the default transformation strategy.
To perform the model update, do the following:
- Make sure your LSPS server, possibly Designer or SDK Embedded Server, is running and your Designer is connected to it.
- Upload the model to the server and create a model instance of the old model: In the GO-BPMN Explorer, right-click the old module and go to Run As > Model.
- Upload the new model to the server: In the GO-BPMN Explorer right-click the new module and go to Upload As > Model.
- Switch to the Management perspective.
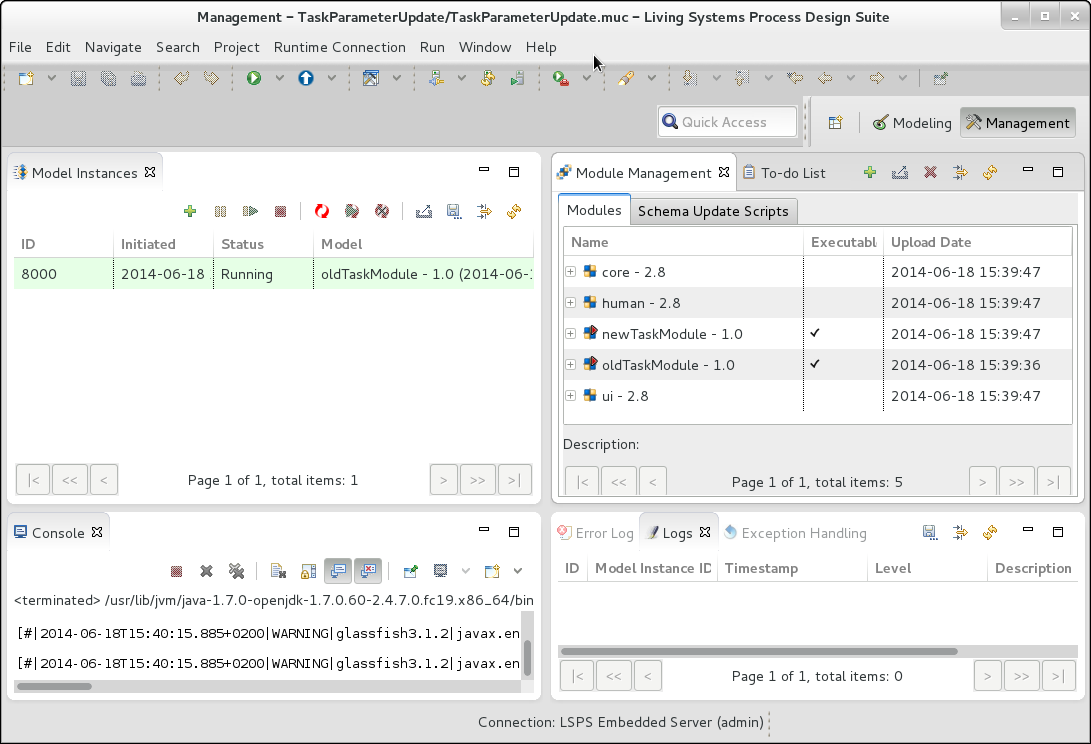
Management perspective with an instance of the old model
- Refresh the Module Management and Model Instances view and check that both models are uploaded and the source model is instantiated.
- Create a new user
guest with all the security roles.
- Go to the Application User Interface and lock the generated to-do:
- Open a browser and go to http://<YOUR_SERVER_DOMAIN>/lsps-application/
- Log in as the user guest.
- Click TO-DO LIST.
- Open the to-do, which was generated by the old model instance.
- With the to-do content displayed, log out, so the guest user locks the to-do.
- Back in the Management perspective, perform the update:
- In the Model Instances view, click the Model Update ( ).
- In the Model Update dialog window, provide the path to your muc file in the Configuration file field and click Next.
- In the refreshed dialog, check that the model instance is listed and selected in the Filtered Model Instances section and click Next. Check the summary of the model update and click Finish.
Refresh the Model Instances view: The model instance should be in the Updated status. If the model instance is in the Pre-processes state, hit the Refresh button again.
If the model instance is in the Pre-processes state, hit the Refresh button again. The model instance is still suspended: If you check the to-do list of the guest user, the to-do is not available since the user task is suspended.
- Check the Log view for the log message of the post-process.
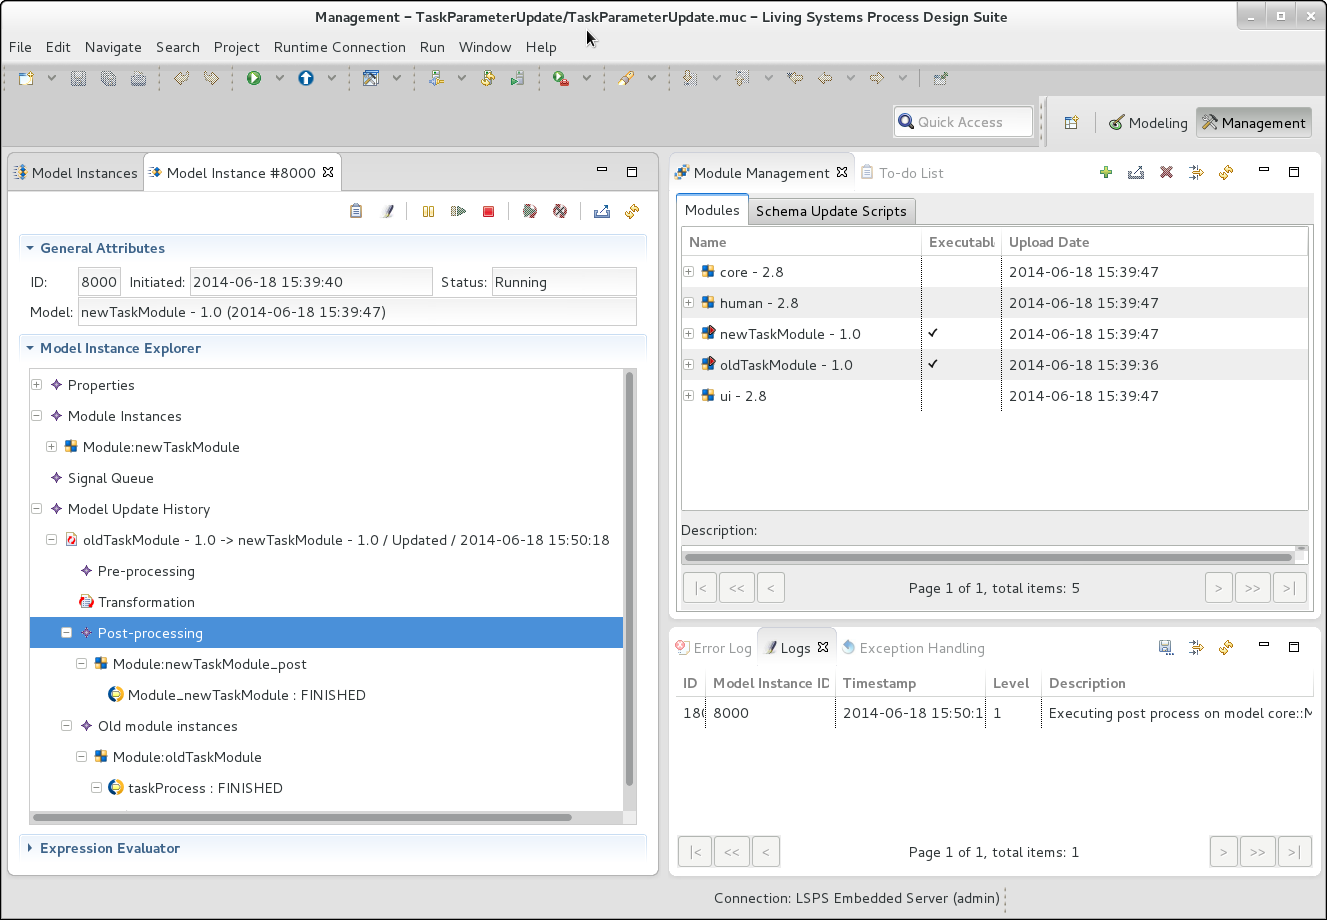
Log view with the post-process log message
- Select the model instance and click Resume (
 ) button. The model instance becomes Running.
- Go to the Application User Interface as the guest user. The to-do list of the guest user still contains the locked to-do in spite of the fact that the new model allows only the admin user as the to-do performer. However, its content already follows the form of the new model.
Set the transformation strategy on the User Task of your muc file to Restart. Leave the strategy on the parent process and module set to Continue and perform the model update anew. The to-do will be discarded.
Note: If you set the strategy on the parent process and module to Restart, the entire process/module will be discarded on update and a new process/module will be instantiated.
Updating an Event Type
Required action: Update a model instance so that its None Start Event is changed to a Conditional Start Event and Timer Intermediate Event changes in a Conditional Intermediate Event.
A change of an event type does not allow to define any pre- or post-processing on the event, or a transformation expression since the change is detected as a removal of the old event and addition of the new event. If required, define model-update processes on the parent modules and process.
- Design the old model with a process definition:
- Create a module with the old process.
- Create a process definition with a None Start Event, a Conditional Flow Event, and a Simple End Event.
- Set the Delay parameter of the Timer Intermediate Event, for example, to
new Duration(years -> 1).
- Design the new model: copy and paste the old module, change the None Start Event to a Conditional Start Event and the Timer Intermediate Event to Conditional Intermediate Event, and set their condition, for example, to false.
- Create the .muc file:
- Right-click the parent project, go to New > Model Update Configuration and follow the wizard.
Open the .muc file and on the Process page and check the element mapping.
The change mapping might be incorrect as shown in Model Update Configuration with Incorrect Mapping: The newUpdateEventType Process is recognized as a new Process, while we want it to be mapped to the oldUpdateEventType Process.
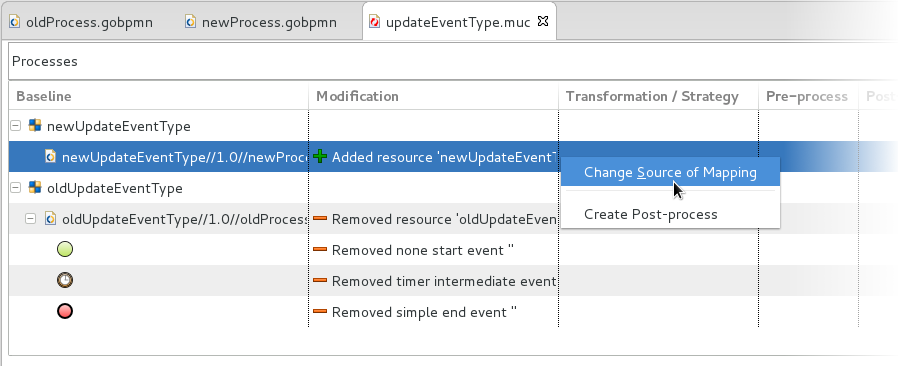
Model Update Configuration with Incorrect Mapping
- Rigth-click the element and adjust the mapping if needed.
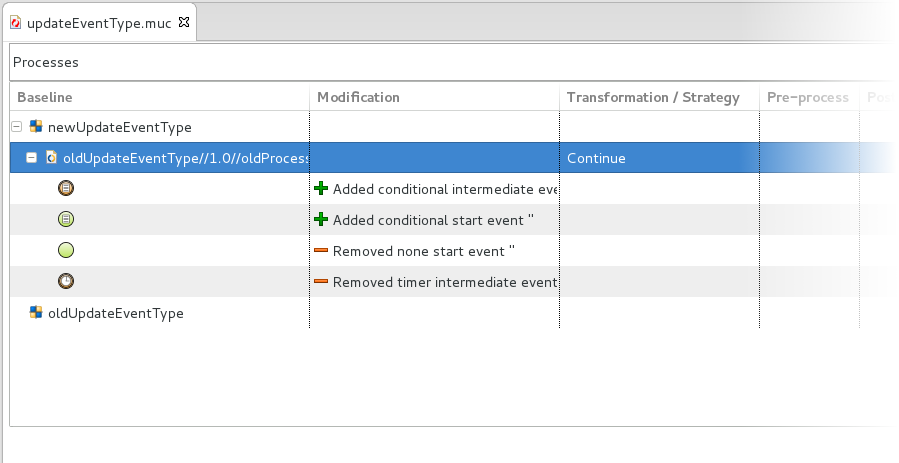
Model Update Configuration with Corrected Mapping
The transformation strategies on the Process is set to Continue. This is the default transformation strategy. If we used the Restart strategy, the process would be restarted on update if on the element at the given moment.
To perform the model update, do the following:
- Make sure your server with the Execution Engine, possibly on Designer or SDK Embedded Server, is running and your Designer is connected to it.
- Upload the model to the server and create a model instance of the old model: In the GO-BPMN Explorer, right-click the old module and go to Run As > Model.
- Upload the new model to the server: In the GO-BPMN Explorer right-click the new module and go to Upload As > Model.
- Switch to the Management perspective.
- Refresh the Module Management and Model Instances view and check that both models are uploaded and the source model is instantiated.
- Switch to the Management perspective.
- Refresh the Module Management and Model Instances view and check that the old model is instantiated and the new model uploaded.
- In the Model Instances view, open the detail of your old model and check the execution diagram of the process.
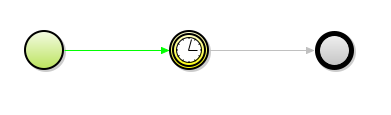
Execution Diagram of the Old Model Instance
- Perform the update:
- In the Model Instances view, click the Model Update ( ) button.
- In the Model Update dialog window, provide the path to your muc file in the Configuration file field and click Next.
- In the refreshed dialog, do not apply any filtering, just click Next so that any available instances of the old model are updated (in this case, exactly one model instance is running).
- Check the summary of the model update and click Finish.
- Refresh the Model Instances view: The model instance should be in the Updated status.
- Click the Continue (
 ) button to trigger the execution of the updated model instance.
- Check the execution diagram of the updated model instance.
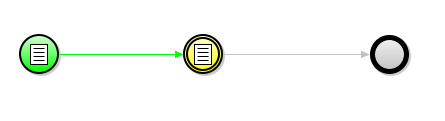
Execution Diagram of the Updated Model Instance
Note that the execution remains on the new Conditional Event.
Now set the transformation strategies on the process to Restart so the Process is restarted on update if on the event. Perform model update as described above: The execution remains on the new Conditional Start Event since the process instance was restarted.
Updating a Data Type
Required action: Update a model instance with a changed data type of a record property.
Important: It is not recommended to update shared records via model update since changes on shared records are reflected on the database. While it is safe to add a new field to a shared record and remove not-nullable fields using model update, modifications to fields, such as modification of their data types, might result in corrupted database schema or data loss. It is recommended to migrate the database directly, not via update of shared records.
When you are updating a model instance to a model with changed non-shared record types, all record instances will be updated according to the transformation expression.
We will update a model instance's data hierarchy as follows:
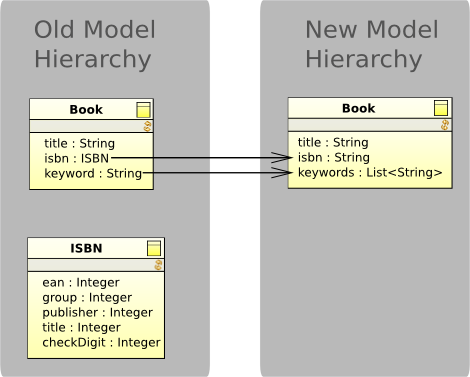
Old and new data type models
The data type update will involve the following changes:
- The ISBN record is removed: No further actions are required.
- The Book.isbn field is changed from the ISBN type to String: The new isbn field must concatenate and format the old instance of ISBN for the given Book instance.
- The keyword field is changed from a string to a list of strings and renamed to keywords: The new keywords field should import the old keyword string.
- Design the old model with a process definition, variable definition, and data type definition as shown in Old model for data type update:
- Create a module with the old data type hierarchy with the
Book and ISBN records.
- Create a global variable definition with a bookSet variable of type
Set<Book> and a book variable of type Book.
- Create a process definition with a None Start Event, a Conditional Flow Event, and a Simple End Event.
- On the flow from the None Start Event define an assignment expression that creates three Book instances assigned to the bookSet global variable:
bookSet := {
  new Book(title -> "Brave New World",
           isbn -> new ISBN(ean -> 978, group -> 1, publisher -> 85399, title -> 393, checkDigit -> 0),
           keyword -> "science fiction"),
  new Book(title -> "Catch-22",
           isbn -> new ISBN(ean -> 978, group -> 1, publisher -> 4055, title -> 387, checkDigit -> 7),
           keyword -> "army"),
  book := new Book(title -> "Brave New World",
                   isbn -> new ISBN(ean -> 978, group -> 1, publisher -> 85399, title -> 393, checkDigit -> 0),
                   keyword -> "science fiction")
}
- Set the Condition parameter on the Conditional Flow Event to
false. The Conditional Flow Event will hold the execution so that the process creates the record instances and then remains running.
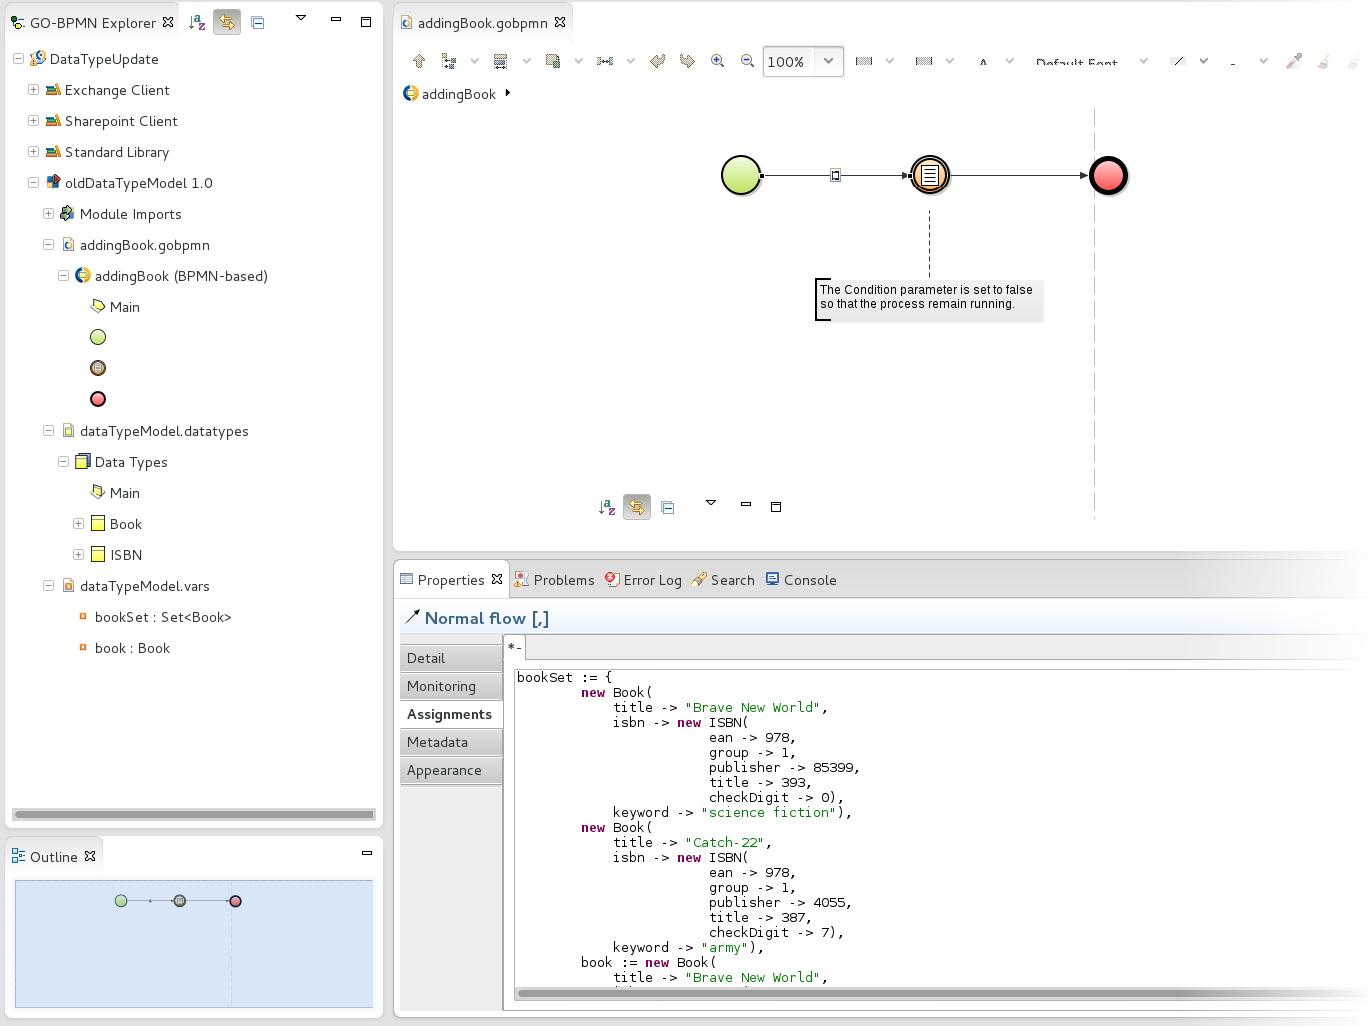
Old model
- Design the new model: copy and paste the old model, modify the data type model, and remove the assignment expression on the flow.
- Create the .muc file:
- Right-click the parent project, go to New > Model Update Configuration and follow the wizard.
- Open the .muc file and on the Data Types page and define the transformation expressions for the isbn record field and the new keywords field:
- isbn:
toString(old("isbn.ean")) + "-" +
old("isbn.group") + "-" +
old("isbn.publisher") + "-" +
old("isbn.title") + "-" +
old("isbn.checkDigit")
- keywords:
[old("keyword")] This expression will take the keyword string and add it to a new list of keywords.
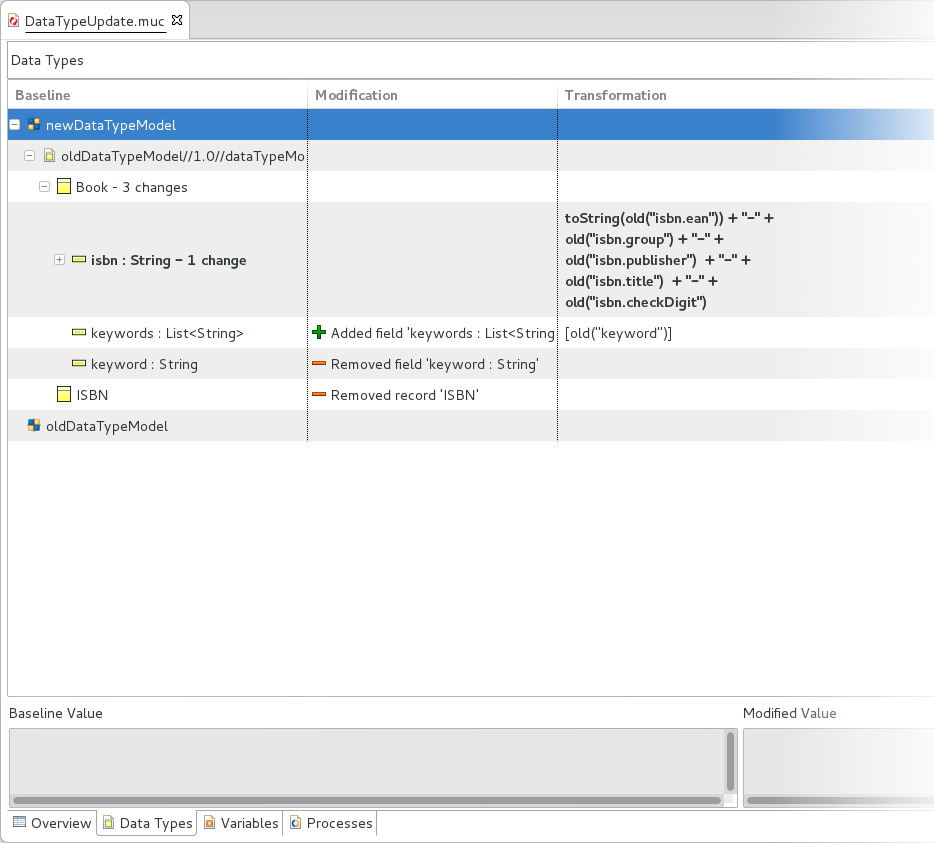
Model Update Configuration with the Data Type Changes
To perform the model update, do the following:
- Make sure your server with the Execution Engine, possibly on Designer or SDK Embedded Server, is running and your Designer is connected to it.
- Upload the model to the server and create a model instance of the old model: In the GO-BPMN Explorer, right-click the old module and go to Run As > Model.
- Upload the new model to the server: In the GO-BPMN Explorer right-click the new module and go to Upload As > Model.
- Switch to the Management perspective.
- Refresh the Module Management and Model Instances view and check that both models are uploaded and the source model is instantiated.
- In the Model Instances view, open the detail of your old model and check the execution diagram of the process.
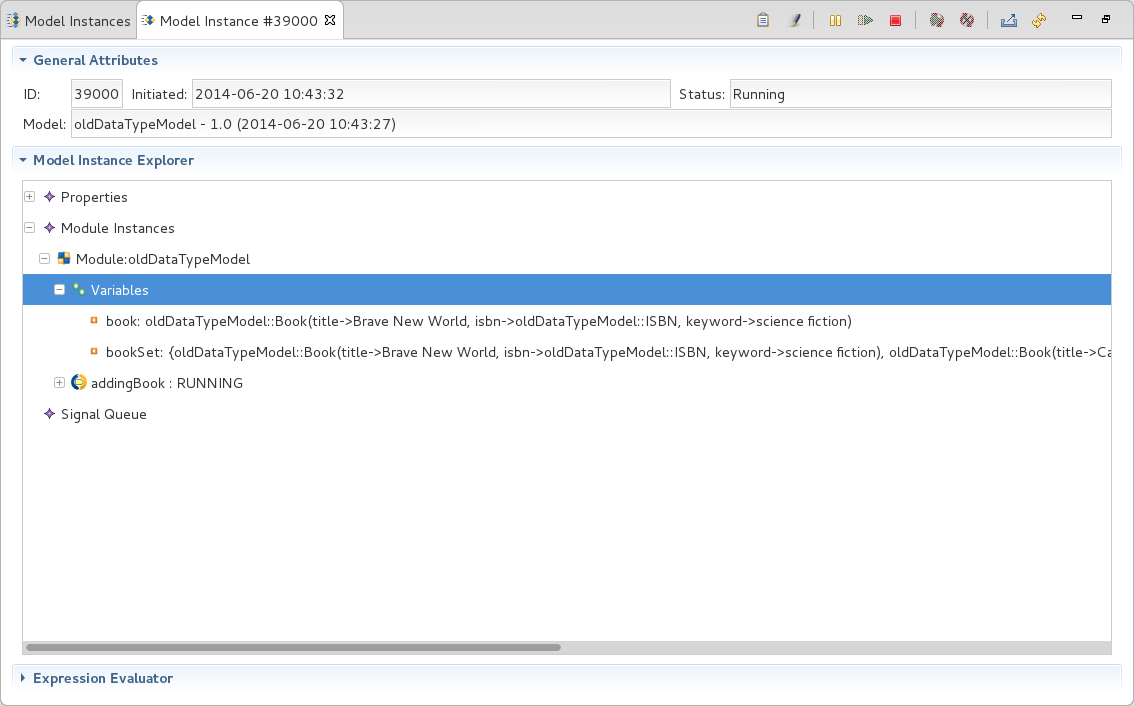
Detail of the Old Model with Old Global Variables
- Perform the update:
- In the Model Instances view, click the Model Update ( ) button.
- In the Model Update dialog window, provide the path to your muc file in the Configuration file field and click Next.
- In the refreshed dialog, do not apply any filtering, just click Next so that any available instances of the old model are updated (in this case, exactly one model instance is running).
- Check the summary of the model update and click Finish.
- Refresh the Model Instances view: The model instance should be in the Updated status.
- Select the model instance and click Resume ( ). The model instance becomes Running.
- Check the Log view for the log message of the post-process.

Detail View of the Updated Model Instance with New Global Variables
The variables hold values of the new data types: the record values were transformed according to the transformation expression defined for the data types.