LSPS Documentation
You will design a business model that will distribute work between by two types of users, the customer and the support specialist:
In addition, tickets will expire if the customer does not add a comment within a period of time.
User story: A customer raises a trouble ticket with an issue.
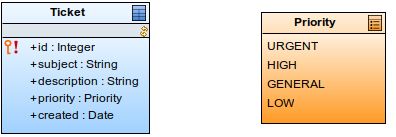
The customer creates a ticket with details, such as, subject, description, date, and priority.
isPersonIn(getCurrentPerson(), Customer()) and UI Definition set to new TicketRaiseForm(). 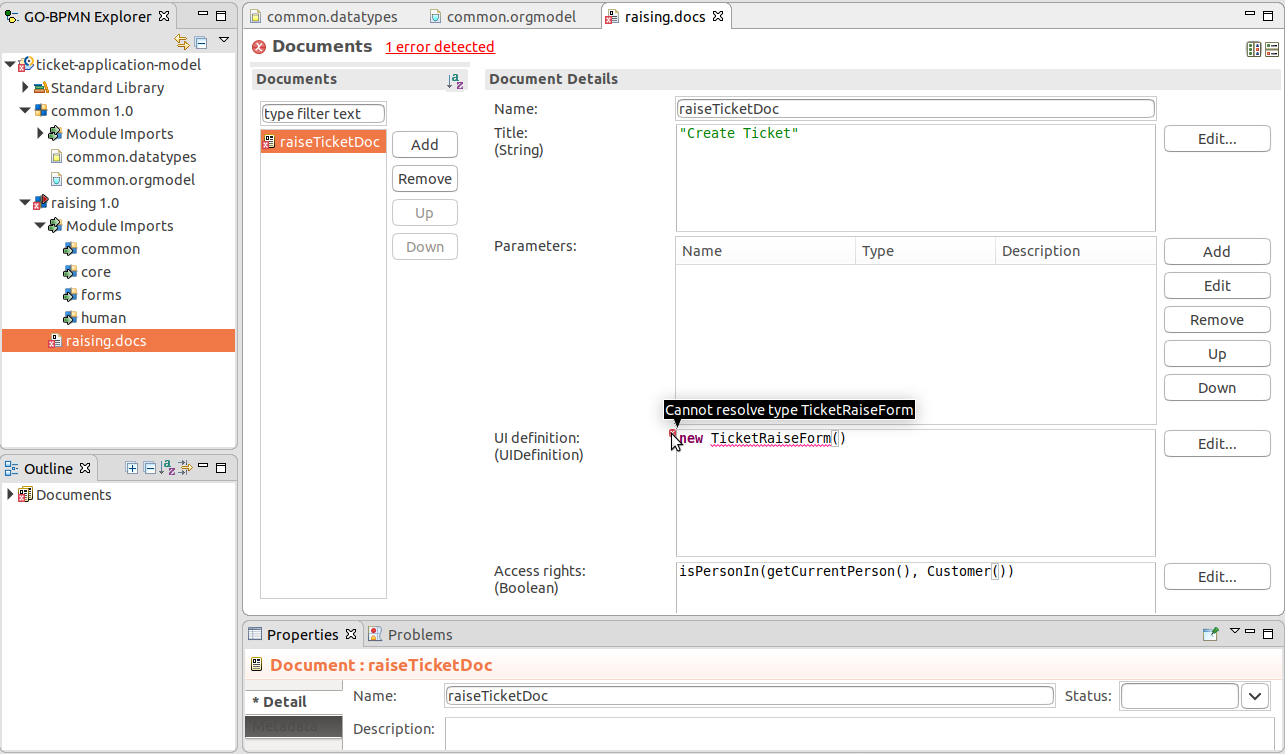
subject and Value bindingdescription and Value bindingpriority, Value binding, and Select items options populated with the expression: collect(
//returns all literals of the Priority enumeration:
Priority.literals(),
// Over each priority literal, create a SelectItem:
{ p:Priority -> new SelectItem(value-> p, label -> p.toString())}
) 
//collects input from from, creates a new ticket,
//and submits the form:
{ e ->
   new Ticket(
    created -> now(),
    //subject of the new ticket is set to the value
    //in the subject Text Input component:
    subject -> subject.getValue(),
    description -> description.getValue(),
    priority -> priority.getValue()?? Priority.GENERAL as Priority
  );
  Forms.submit()
}
localhost:8080/lsps-application) as the person and create a ticket.lsps and password lsps. 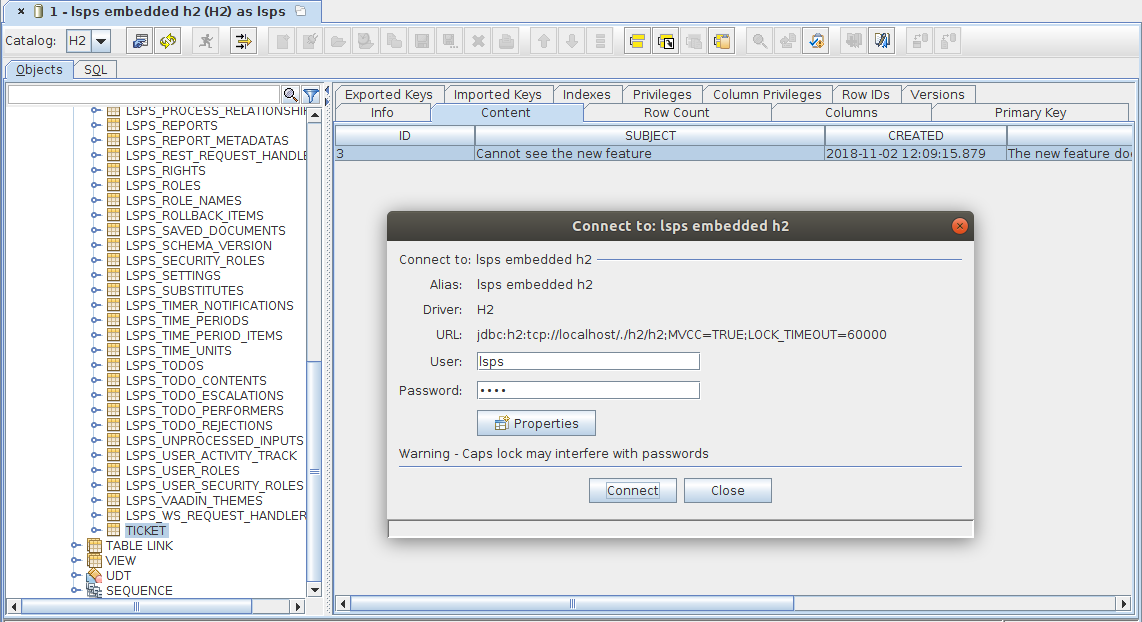
You have done the following:
roleTicketDoc accessible only to a customer so that customer users can enter a new ticket as a new instance of the Ticket shared record.getLabel() to get the label, for example, in the caption of a form component and keep labels in your forms consistent. This can be especially helpful when localization of model resources is required. 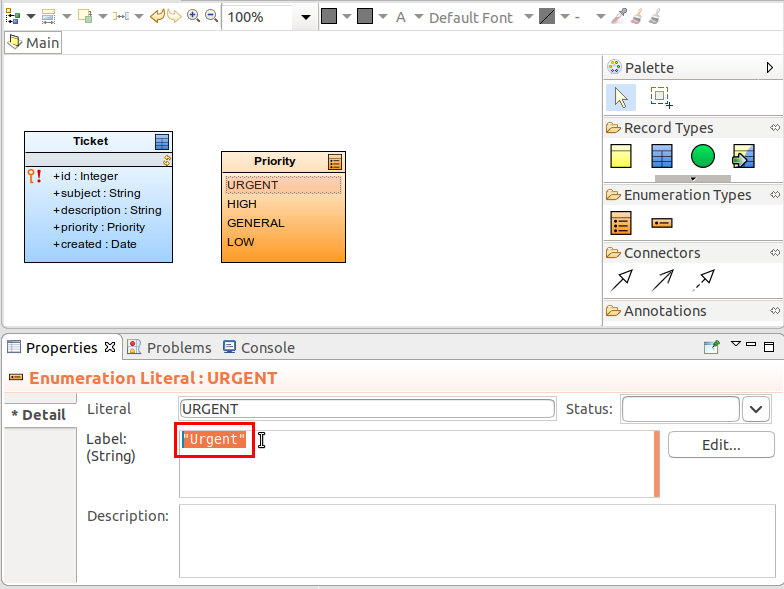
collect(
  Priority.literals(),
  { p:Priority -> new SelectItem(value-> p, label -> p.getLabel())}
)
c.setWidthFull() on the Init tab of each input component.c.setNullSelectionAllowed(false).
 menu button.
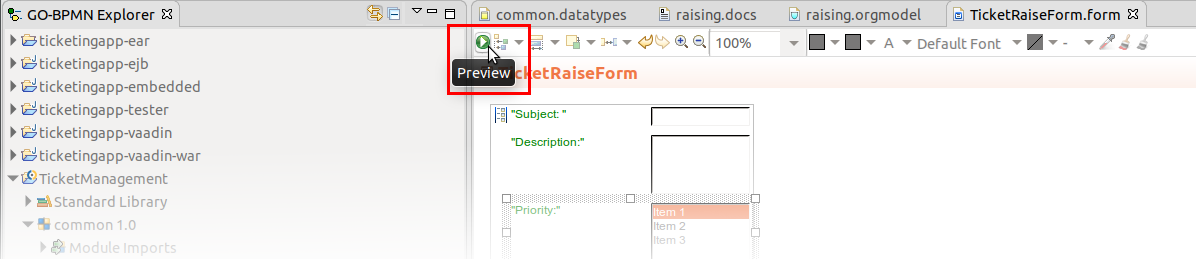
Form:Preview right to display such previews; You can modify the rights of a security role in the Security Management view in the Management perspective. 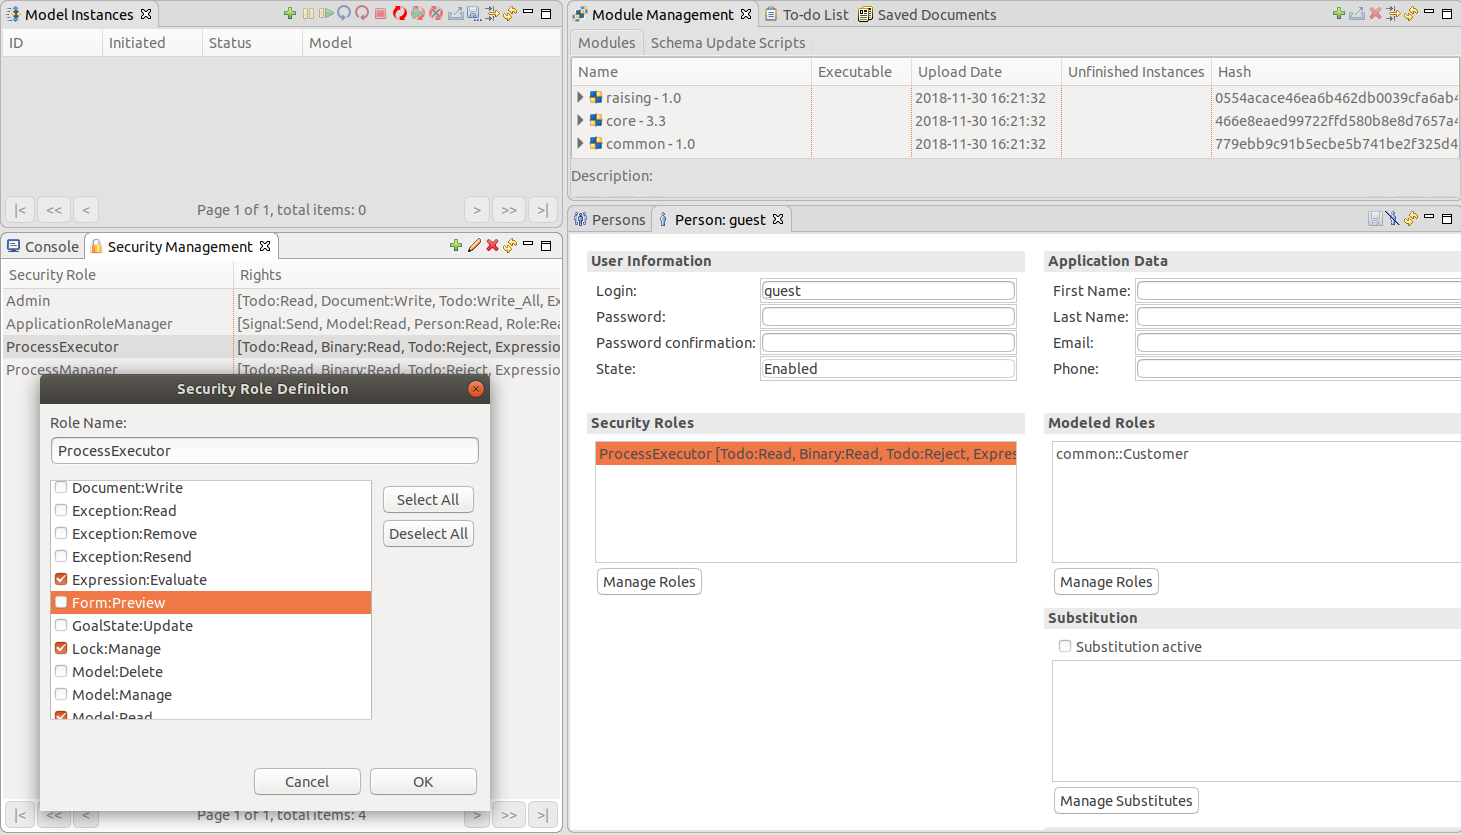
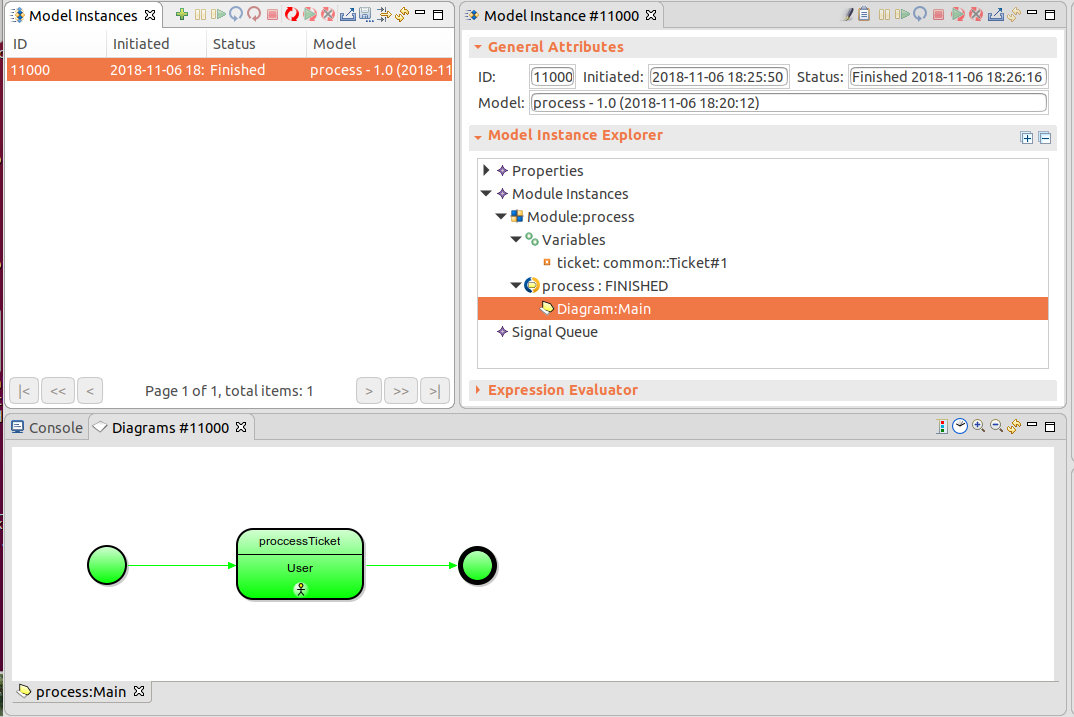
User story: A support specialist resolves the ticket.
When the customer submits the ticket, the status of the created ticket becomes open and the server creates a to-do for the support specialists.
status of type Status to Ticket and create the Status enumeration. Set the labels for its literals. 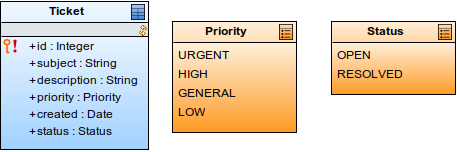
{ e ->
   def Ticket newTicket := new Ticket(
    created -> now(),
    subject -> subject.getValue(),
    description -> description.getValue(),
    //sets priority to GENERAL if not set:
    priority -> priority.getValue()?? Priority.GENERAL as Priority,
    //added this line:
    status -> Status.OPEN
  );
  Forms.submit()
}
{ e ->
//saving new ticket in the newTicket expression variable:
def Ticket newTicket := new Ticket(
created -> now(),
subject -> subject.getValue(),
description -> description.getValue(),
priority -> priority.getValue() as Priority,
status -> Status.OPEN
);
//creating model instance with the newTicket as its process entity
//(it is passed to the model instance as a special property):
createModelInstance(
synchronous -> false,
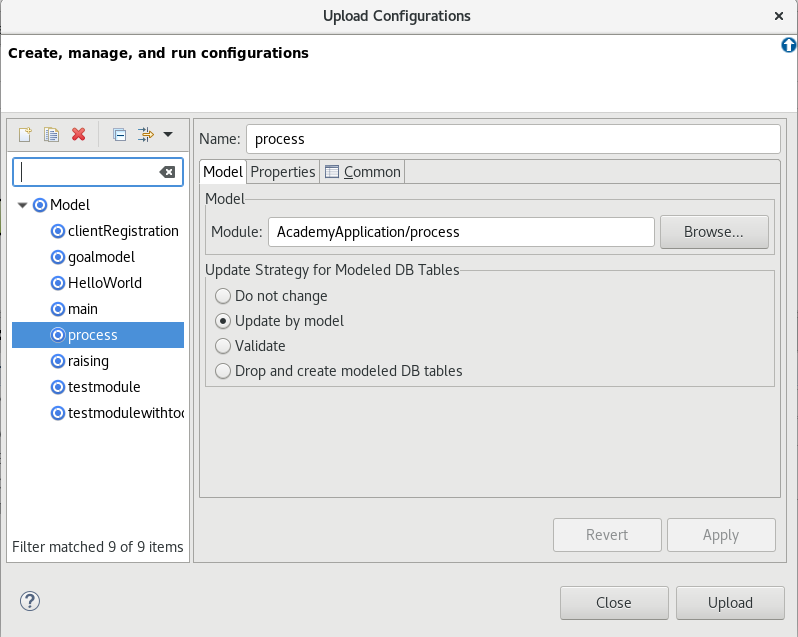
//you will create the executable module *process* in the next step:
model -> getModel("process"),
processEntity -> newTicket,
properties -> null);
Forms.submit()
}getProcessEntity(Ticket).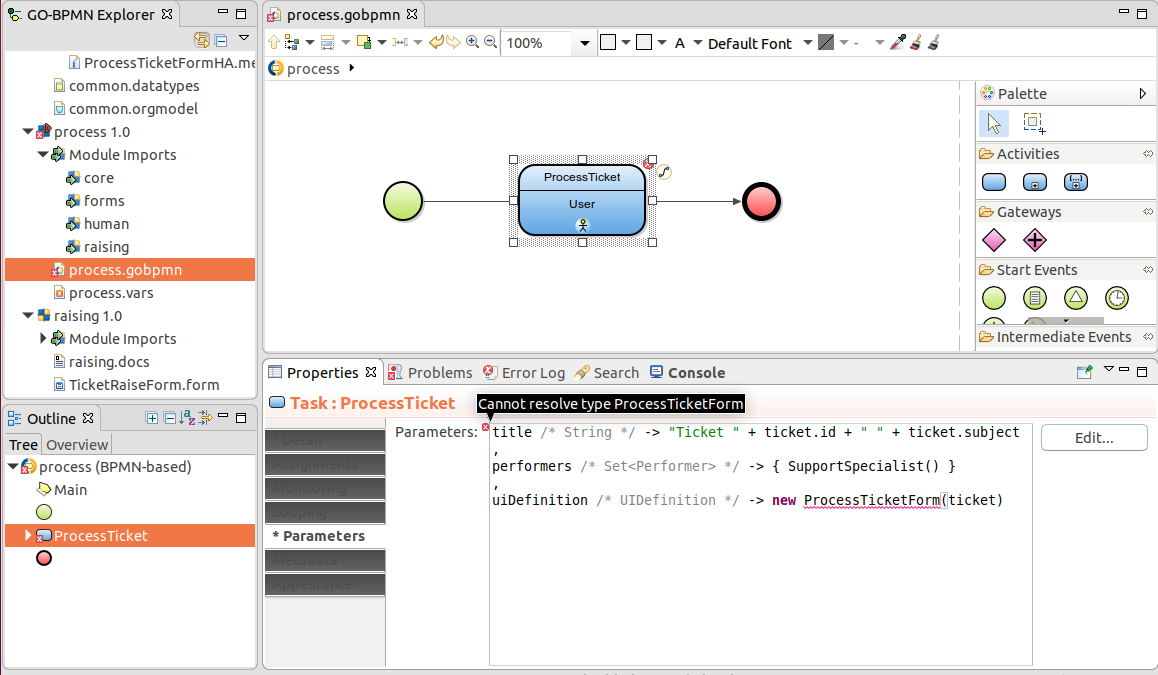
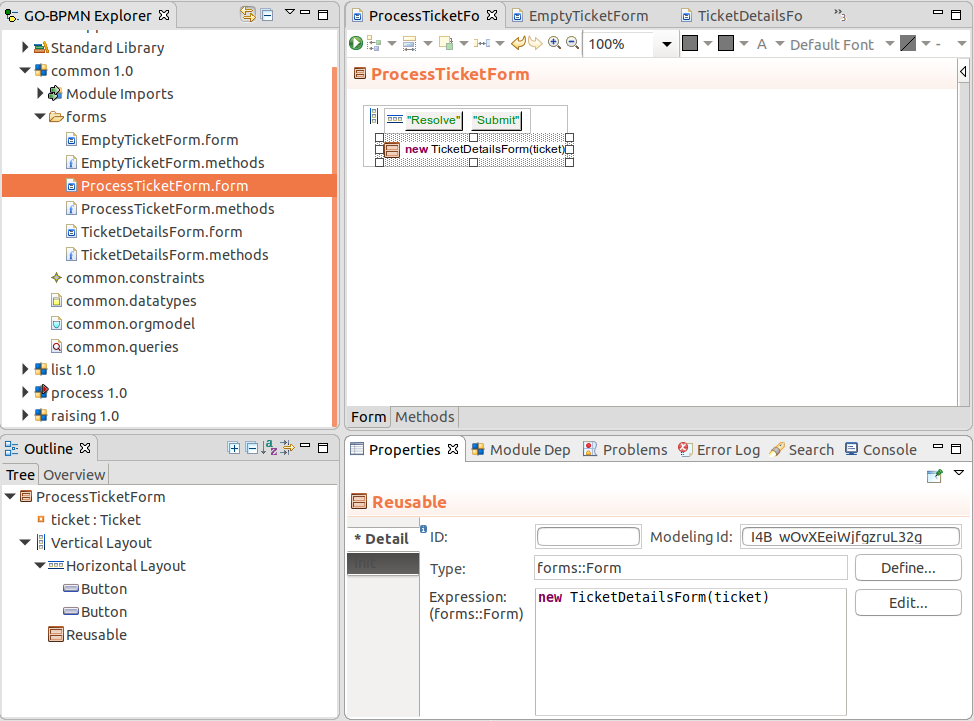
//content of the ProcessTicketForm.methods file:
ProcessTicketForm {
//constructor that sets ticket form variable to the passed ticket argument:
  public ProcessTicketForm(Ticket ticket){
     this.ticket := ticket
  }
}
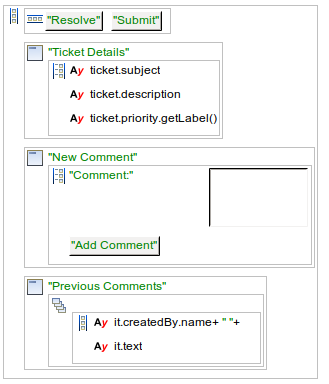
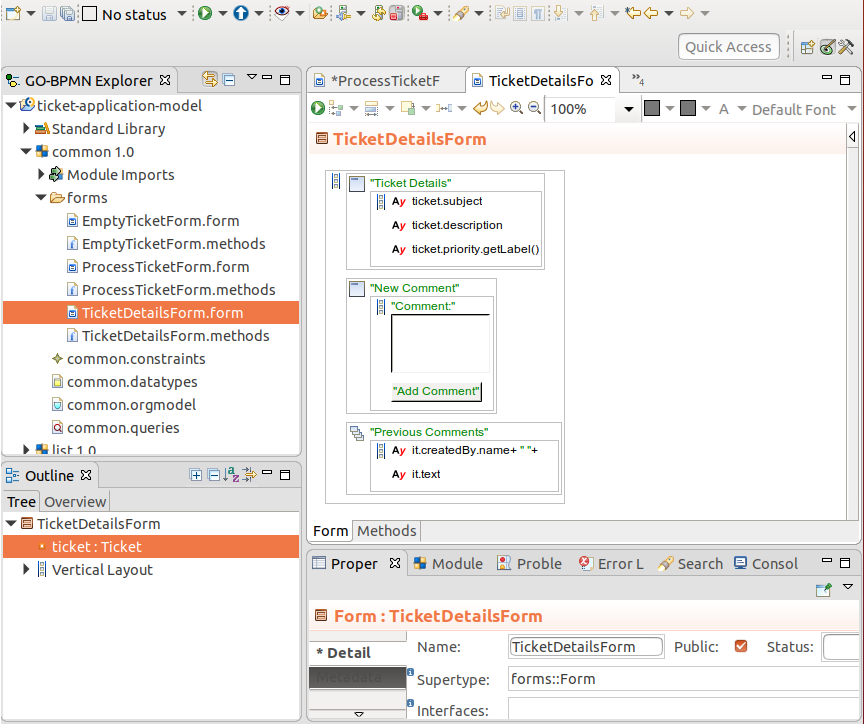
ticket.subjectticket.descriptionticket.priority.getLabel()
{ e ->
    ticket.status := Status.RESOLVED;
    Forms.submit();
}
User story: The customer and support specialist add comments to the ticket.
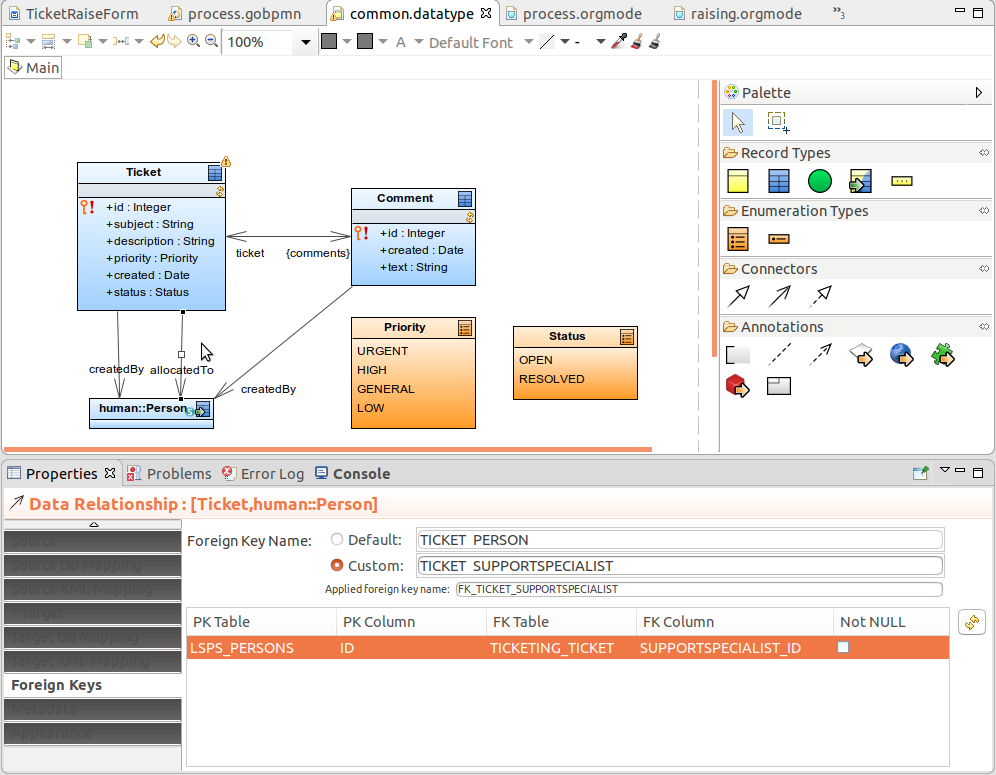
This means you need to start tracking the customer who raised the ticket so you know whom to ask for further comments as well as the comments and their authors. For the time being, a ticket does not have to be handled by the same support specialist.
Insert Record Import of human:Person.
Person represents all users of the LSPS Application.

{ e ->
   //saving new ticket in the newTicket expression variable:
   def Ticket newTicket := new Ticket(
    created -> now(),
    subject -> subject.getValue(),
    description -> description.getValue(),
    priority -> priority.getValue() as Priority,
    status -> Status.OPEN,
    //added this:
    createdBy -> getCurrentPerson()
  );
   ...
comment.{ e -> Forms.submit(); } so the user can submit the to-do without resolving the ticket.{
e -> new Comment(
created -> now(),
text -> comment.getValue(),
ticket -> ticket,
createdBy -> getCurrentPerson()
);
//clears the comment text area:
comment.setValue("");
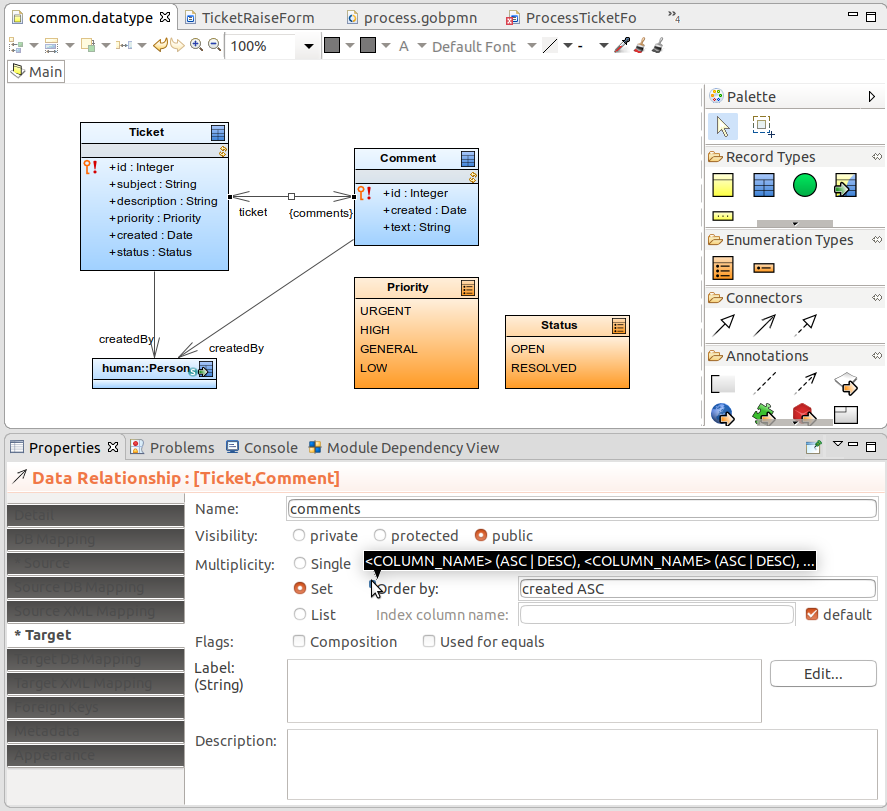
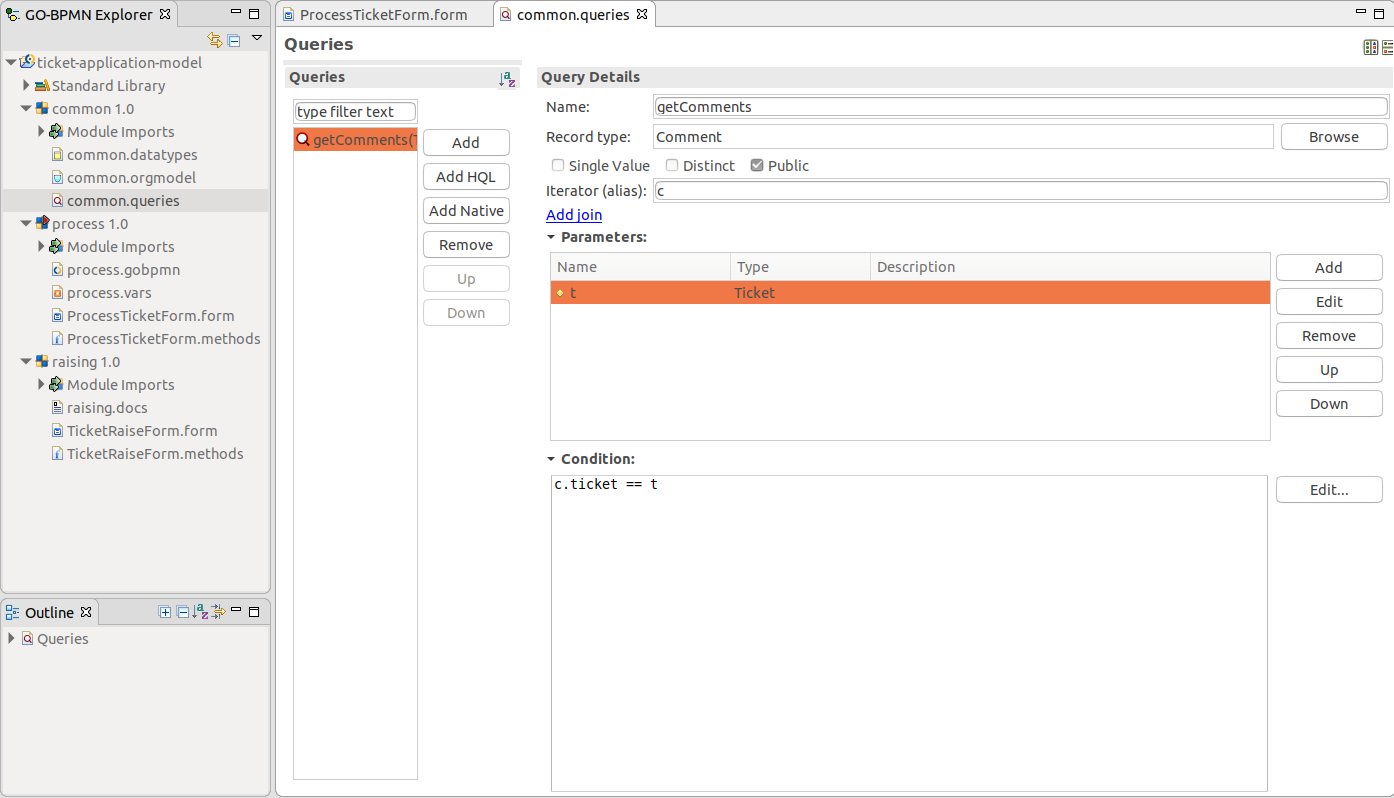
}previousComments which will display existing comments:getComments(ticket).Comment.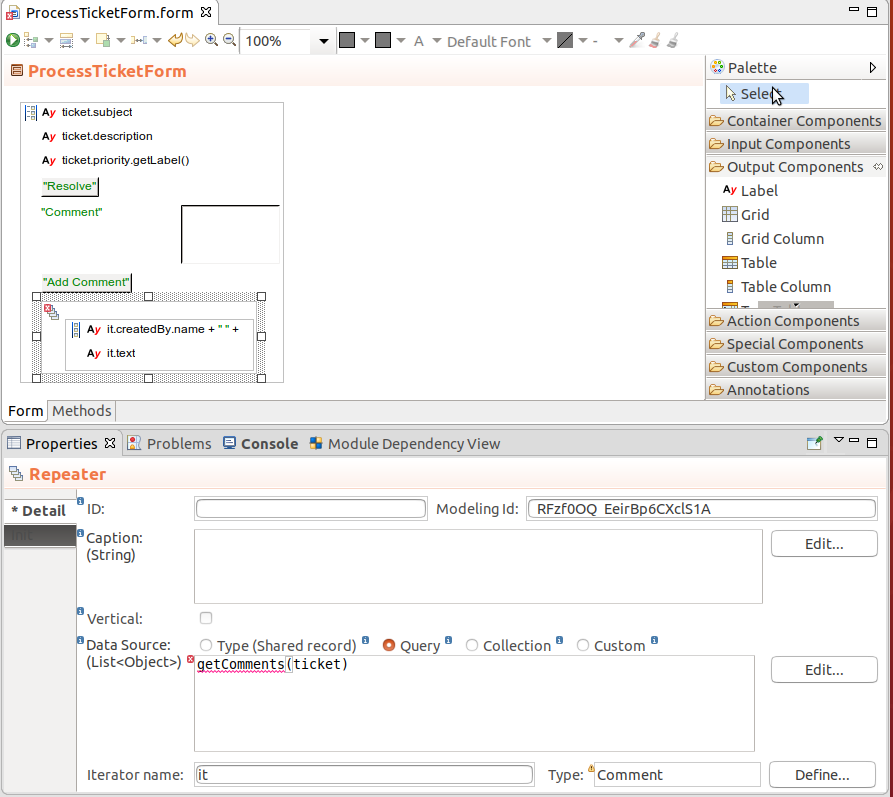
{
   e -> new Comment(
          created -> now(),
          text ->  comment.getValue(),
          ticket -> ticket,
          createdBy -> getCurrentPerson()
          );
       comment.setValue("");
       //ADDED: refreshes the list of previous comments
       //so they show the new comment:
       previousComments.refresh()
}ticket.status==Status.RESOLVED (the flow will be taken only when the ticket is resolved).CommentTicket.title -> "Support has commented your ticket " + ticket.id,
performers -> { ticket.createdBy },
uiDefinition -> new ProcessTicketForm(ticket)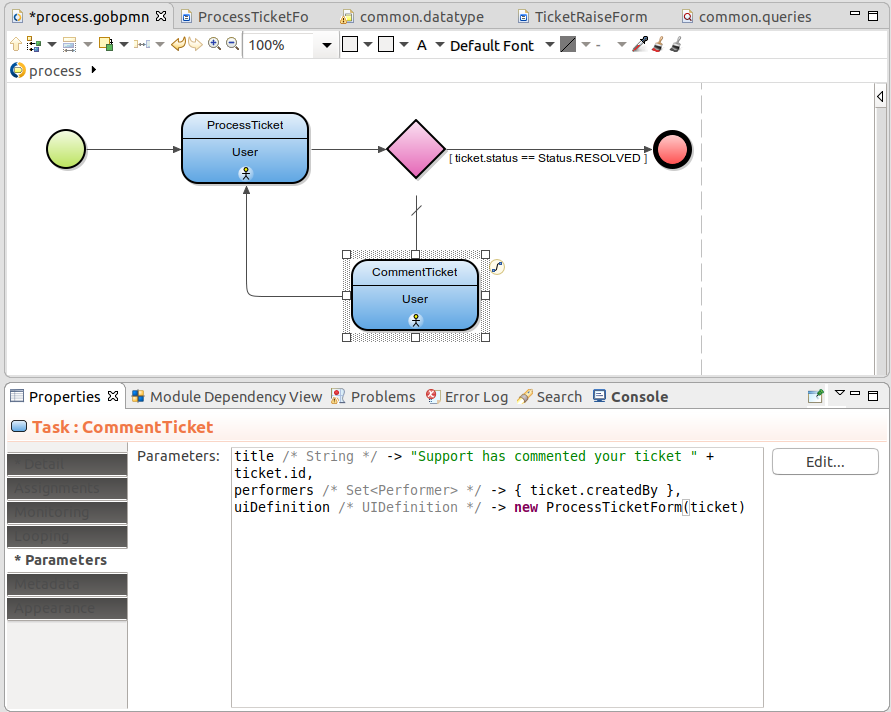
if not isPersonIn(getCurrentPerson(), SupportSpecialist())
then
  c.setVisible(false)
end
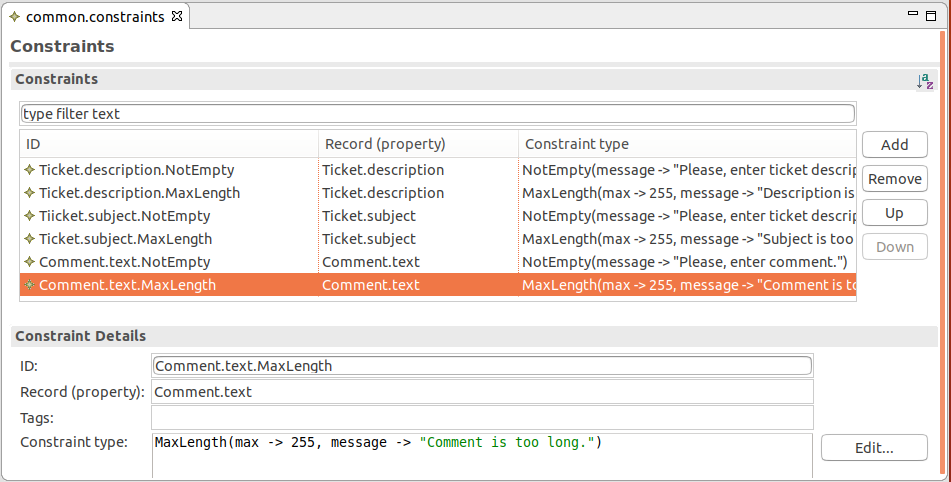
User story: The customer must always define a subject and description of their ticket.
createButton.
{ e ->
    def RecordProxySet recordProxySet := createProxySet(null);
    def Ticket newTicket := recordProxySet.proxy(Ticket);

    newTicket.created := now();
    newTicket.subject := subject.getValue();
    newTicket.description := description.getValue();
    newTicket.priority := priority.getValue()?? Priority.GENERAL as Priority;
    newTicket.status := Status.OPEN;
    newTicket.createdBy := getCurrentPerson();

    createModelInstance(
...
recordProxySet.merge(false); and create the process model instance.showDataErrorMessages(constraintViolations, createButton)Final click listener expression on the Create Ticket button
{ e ->
   def RecordProxySet recordProxySet := createProxySet(null);
   def Ticket newTicket := recordProxySet.proxy(Ticket);

   newTicket.created := now();
   newTicket.subject := subject.getValue();
   newTicket.description := description.getValue();
   newTicket.priority := priority.getValue()?? Priority.GENERAL as Priority;
   newTicket.status := Status.OPEN;
   newTicket.createdBy := getCurrentPerson();

  def List<ConstraintViolation> constraintViolations := validate(newTicket, null, null, null);

  if constraintViolations.isEmpty() then
    recordProxySet.merge(false);
    createModelInstance(
      synchronous -> false,
      model -> getModel("process"),
      processEntity -> newTicket,
      properties -> null);
    Forms.submit();
  else
    //display violation messages on create button:
    showDataErrorMessages(constraintViolations, createButton)
  end
}TicketRaiseForm.submitTicket() method for better maintenance and call the method from the click listener expression. //new click listener expression:
{ e ->
submitTicket()
}Make the ticket data in TicketRaiseForm easier to manage:
public TicketRaiseForm(){
   recordProxySet := createProxySet(null);
   newTicket := recordProxySet.proxy(Ticket);
}Resulting TicketRaiseForm constructor and submitTicket() method
TicketRaiseForm {

   public TicketRaiseForm(){
     recordProxySet := createProxySet(null);
     newTicket := recordProxySet.proxy(Ticket);
   }
   public void submitTicket(){

     newTicket.created := now();
     newTicket.subject := subject.getValue();
     newTicket.description := description.getValue();
     newTicket.priority := priority.getValue()?? Priority.GENERAL as Priority;
     newTicket.status := Status.OPEN;
     newTicket.createdBy := getCurrentPerson();

     def List<ConstraintViolation> constraintViolations := validate(newTicket, null, null, null);

    if constraintViolations.isEmpty() then
      recordProxySet.merge(false);
      createModelInstance(
        synchronous -> false,
        model -> getModel("process"),
        processEntity -> newTicket,
        properties -> null);
      Forms.submit();
    else
      //display violation messages on submitTicket:
      showDataErrorMessages(constraintViolations, submitButton)
    end
   }
}
&newTicket.subject for the subject input field. 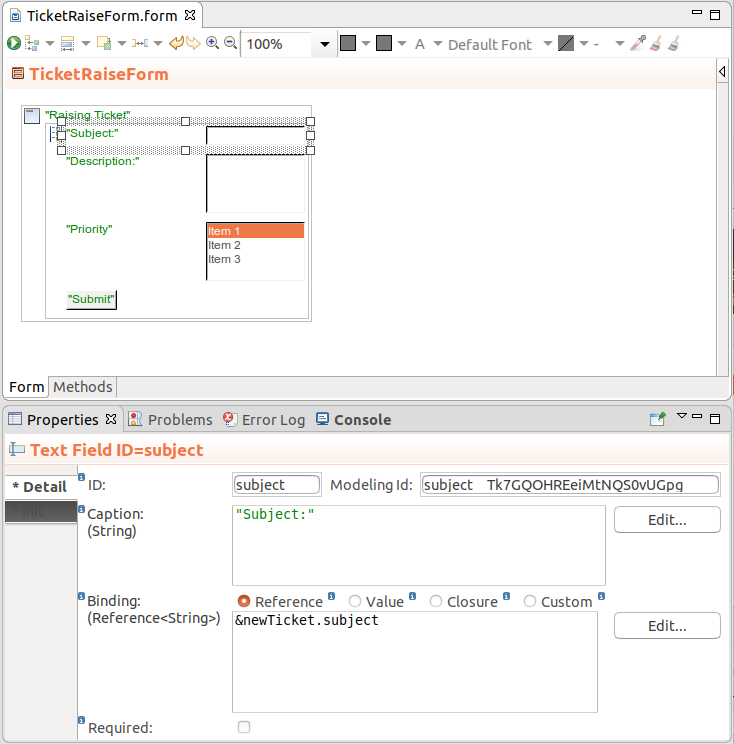
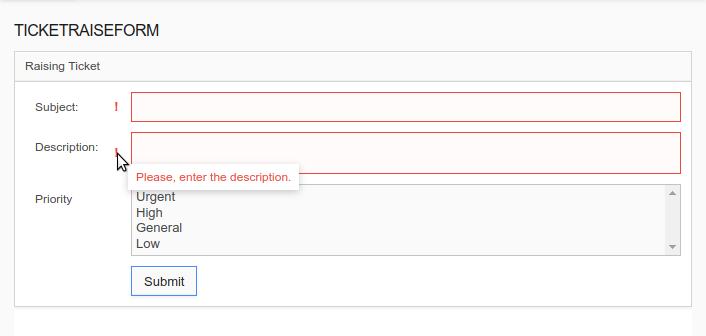
formLayout and adjust the showDataErrorMessages call. The messages will be displayed on the components bound to the respective record field. ...
createModelInstance(
synchronous -> false,
model -> getModel("process"),
processEntity -> newTicket,
properties -> null);
Forms.submit();
else
//display violation messages on the form layout or
//children of the form root for record bindings:
showDataErrorMessages(constraintViolations, formLayout)
end
}
}
//Click listener on the Add Comment button
//in TicketDetailsForm:
{
   e ->
      def RecordProxySet recordProxySet := createProxySet(null);
      def Comment newComment := recordProxySet.proxy(Comment);

      newComment.created := now();
      newComment.text := comment.getValue();
      newComment.ticket := ticket;
      newComment.createdBy := getCurrentPerson();
      def List<ConstraintViolation> constraintViolations := validate(newComment, null, null, null);

      if (constraintViolations.isEmpty()) then
        recordProxySet.merge(false);
        comment.setValue("");
        previousComments.refresh();
      else
        showDataErrorMessages(constraintViolations, comment)
      end
}
Validation message on the component with constraint violation
User story: If the customer does not respond to a comment of a support specialist within a given period of time, the ticket times out.
now() + days(3).ticket.status := Status.ABANDONED;
log("Ticket " + ticket.id + " has been abandoned.", INFO_LEVEL) 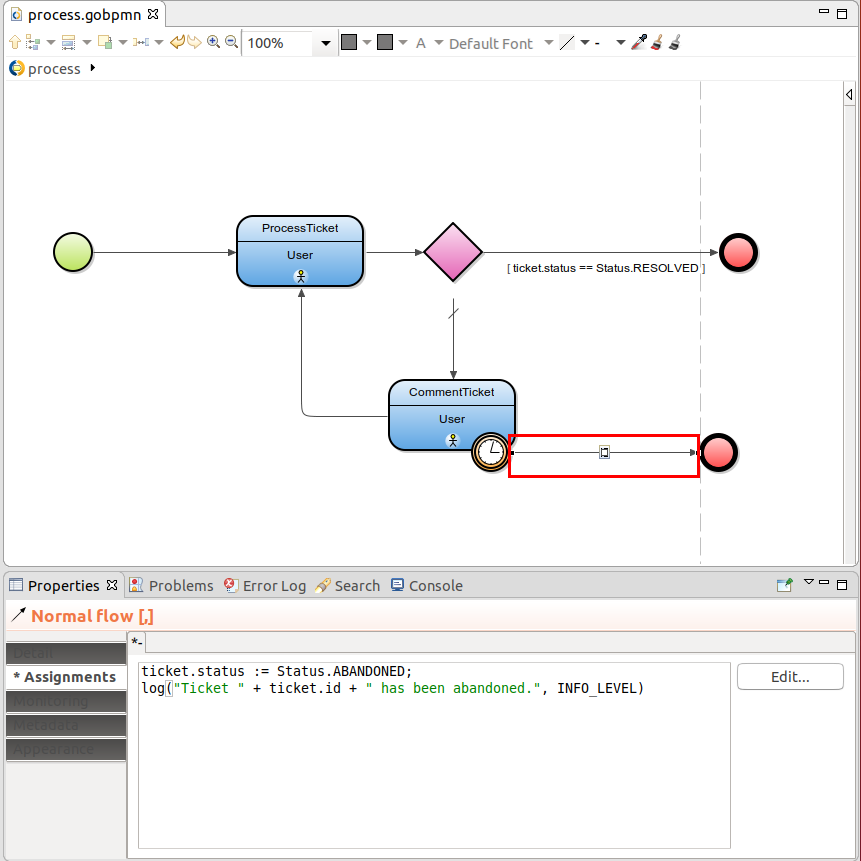
User story: Once a support specialist opens a ticket, it is handled exclusively by them for the rest of the ticket life (Currently, the ProcessTicket task can be handled by any user with the SupportSpecialist role).
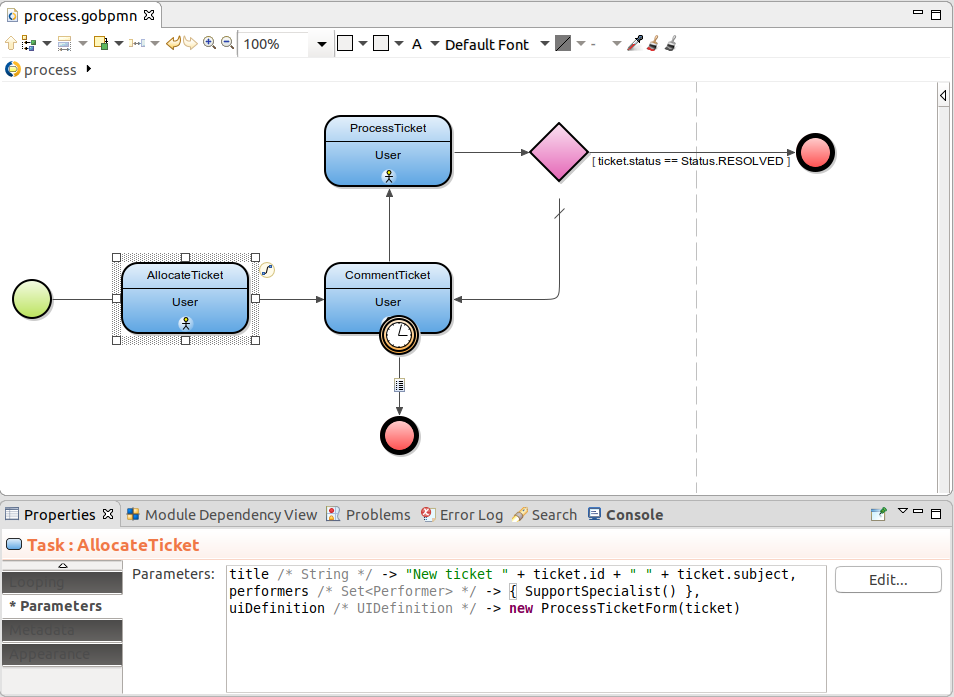
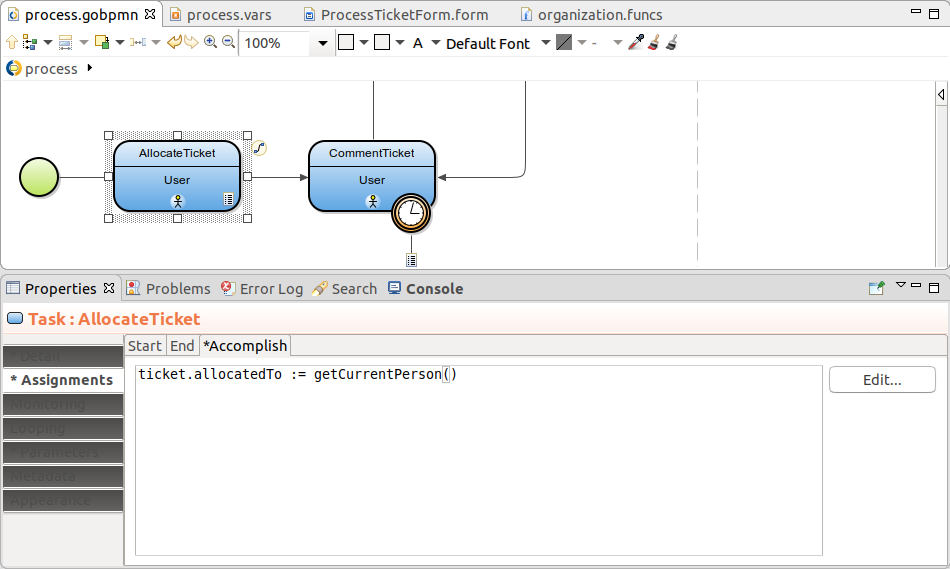
performers /* Set<Performer> */ -> { ticket.allocatedTo }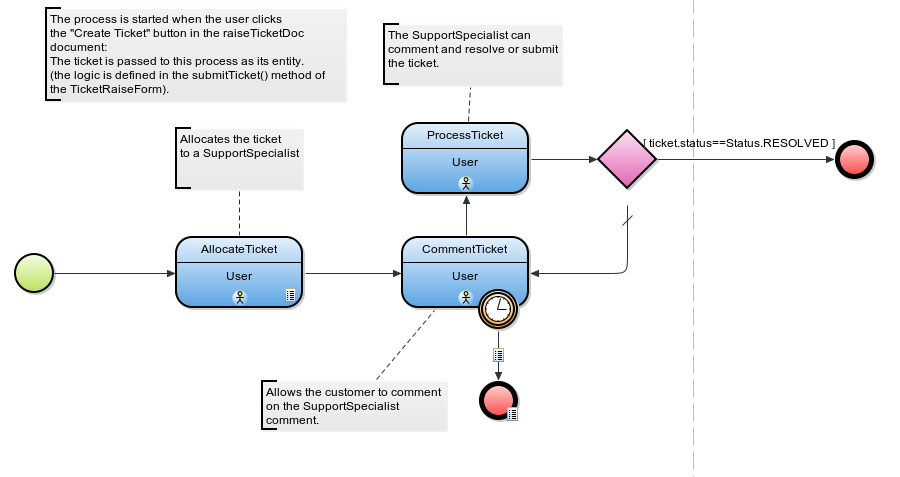
User story: A support specialist can view all their open tickets on one page.
t.allocatedTo == supportSpecialist && t.status == Status.OPENt.created, DESC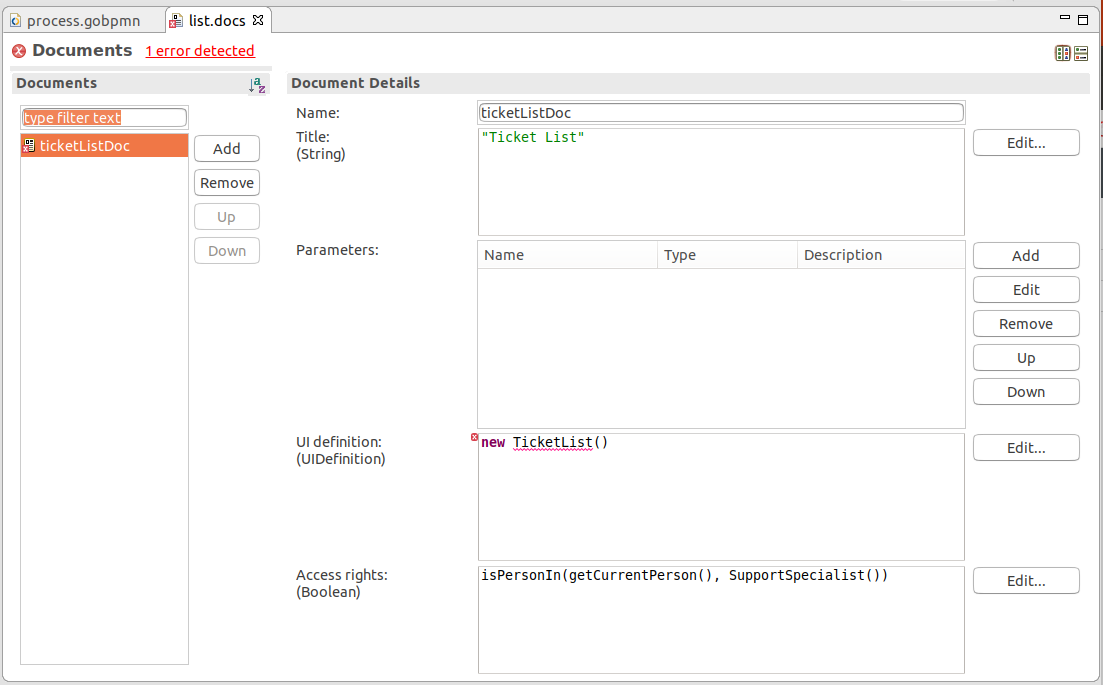
ticketGrid.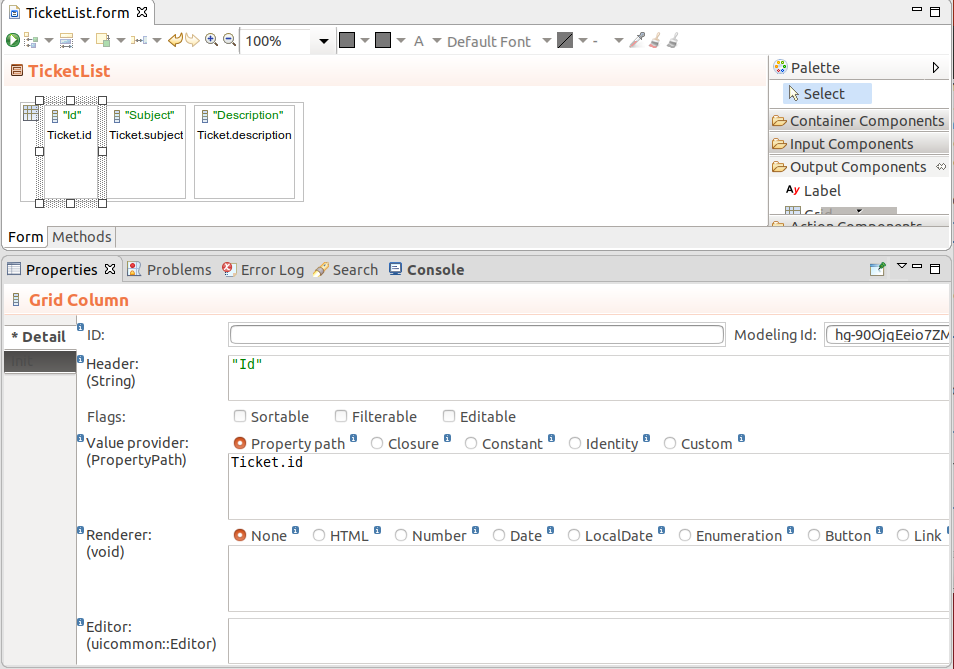
User story: The support specialist can view the details and add a comment to their open Tickets at any time.
Allow the support specialist to display details of a ticket from the ticket list and comment on the selected ticket.
TicketDetailsForm {
  //constructor that initializes the form variable ticket
  //to the parameter argument:
  public TicketDetailsForm(Ticket ticket){
     this.ticket := ticket
  }
}
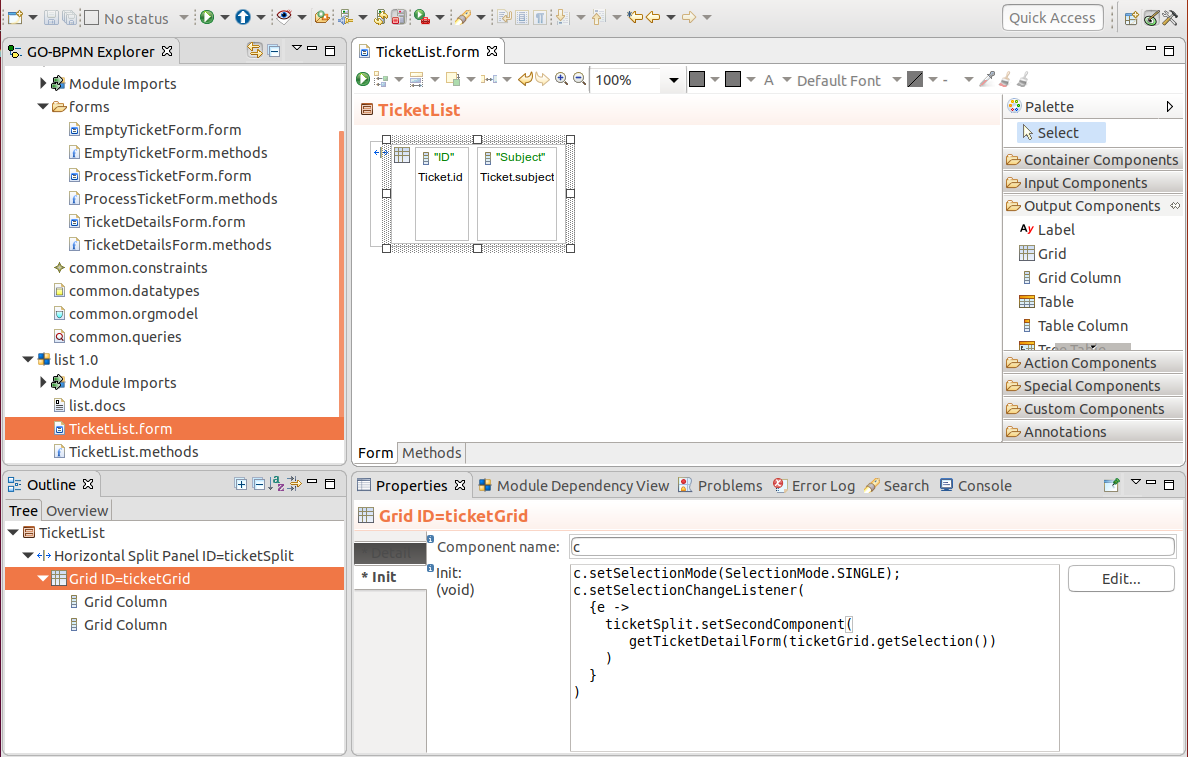
ticketSplit.c.setSelectionMode(SelectionMode.SINGLE)c.setSelectionChangeListener({e ->
ticketSplit.setSecondComponent(
getDetailForm(ticketGrid.getSelection())
)
}
)getDetailForm() method for the form. Note that selection can be null, either when the form is loaded or when the user unselects a ticket; You will display another form in such a case: private FormComponent getDetailForm(List<Object> selection){
if ! selection.isEmpty() then
(new TicketDetailsForm(selection[0] as Ticket)).getWidget()
else
(new EmptyTicketDetailsForm()).getWidget()
end
}
Optionally, go through the agile-pattern tutorial.
Then proceed to Application