This guide describes how to configure WebSphere with Oracle and DB2 for LSPS.
Prerequisites:
To set up IBM WebSphere Application Server with LSPS, do the following:
- Install WebSphere:
- Open the WebSphere Application Server Administrative Console.
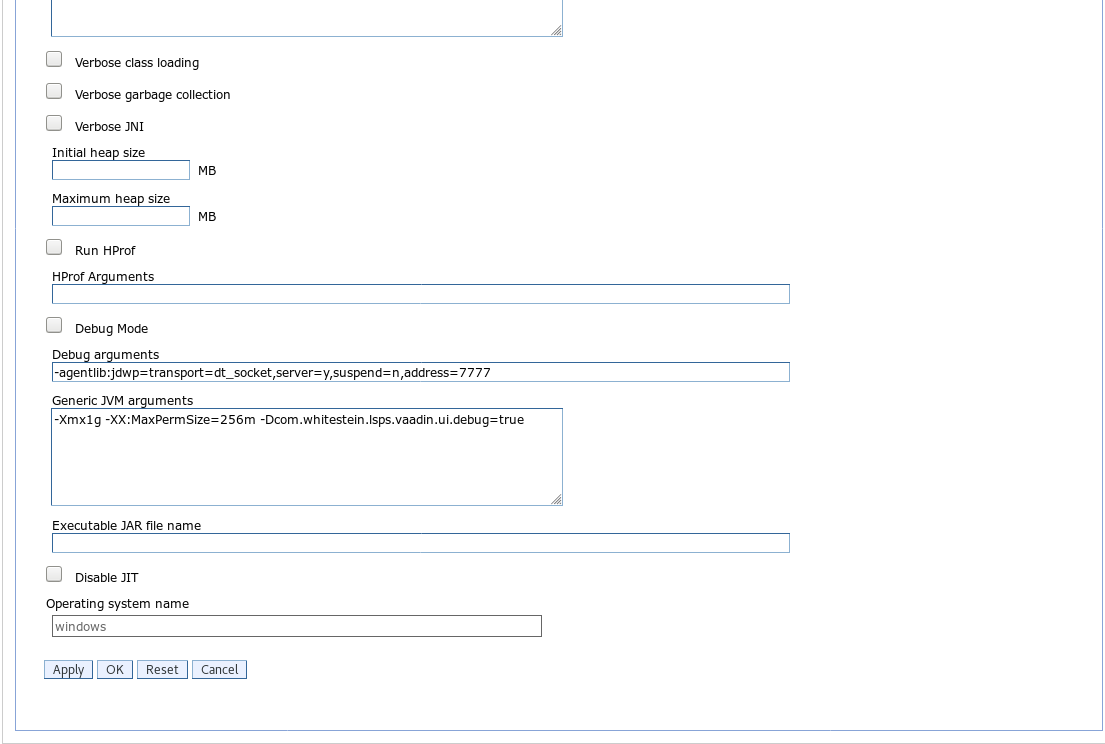
- Configure the JVM arguments:
- In the Administration Console, expand Servers > Server Type and click WebSphere application servers.
- On the right, click the name of your server.
- On the Configuration tab of the server detail page, expand Java and Process Management and click Process Definition.
- Under the Additional Properties section on the right, click Java Virtual Machine.
- Scroll down.
- Under Generic JVM arguments, enter the memory arguments, for example,
-Xmx1g -XX:MaxPermSize=256m.
- Optionally, in the Generic JVM arguments, allow testing and profiling by adding the arguments:
- To enable running of automated Testbench and Selenium tests, add the
-Dcom.whitestein.lsps.vaadin.ui.debug=true parameter.
- To enable analysis of performance issues with the LSPS Profiler, add the
-DlspsProfile=true parameter.
- Enter the database credentials:
- On the left, expand Security and click Global Security.
- On the right, expand Java Authentication and Authorization Service and click J2C authentication data.
- Click New to create an authentication user:
- Alias:
LSPS_DS_AUTH
- User ID:
lsps
- Password:
<PASSWORD>
- Click Apply.
- Create the JDBC provider for your database:
- On the left, expand Resources > JDBC and click JDBC providers.
- On the right, select the node visibility in the Scope dropdown box.
- Setup the JDBC provider for your database:
- If you are using Oracle:
- Copy the Oracle JDBC driver to
$WAS_INSTALL_ROOT/OracleJDBCdriver/ojdbc6.jar, for example, c:\sw\IBM\WebSphere\AppServer\OracleJDBCdriver\ojdbc6.jar
- Click New and set the properties:
- Database type: Oracle
- Provider type: Oracle JDBC Driver
- Implementation type: XA data source
- Name: Oracle JDBC Driver (XA)
- Click Next.
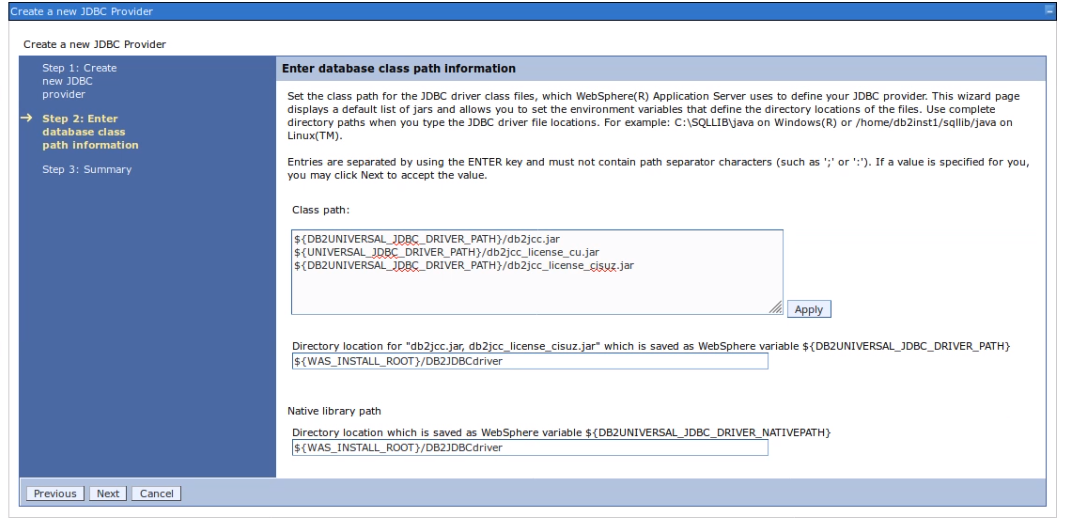
- Enter the database-class-path information:
- Class path:
${ORACLE_JDBC_DRIVER_PATH}/ojdbc6.jar
- Directory location for ojdbc6.jar:
$WAS_INSTALL_ROOT/OracleJDBCdriver
- Click Next and Finish.
- If you are using DB2
- Copy the Oracle JDBC driver to
$WAS_INSTALL_ROOT/DB2JDBCdriver/db2jcc4.jar, for example, c:\sw\IBM\WebSphere\AppServer\DB2JDBCdriver\db2jcc4.jar
- Click New and set the properties:
- Database type: DB2
- Provider type: DB2 Universal JDBC driver provider
- Implementation type: XA Datasource
- Name: DB2 Universal JDBC Driver Provider (XA)
- Set the DB2UNIVERSAL_JDBC_DRIVER_PATH variable to point to the location with the jar files.
- Create JDBC XA data source:
- To set up an Oracle data source, do the following:
- On the left, expand Resources > JDBC and click Data sources:
- Select the visibility of the data source in the Scope dropdown; for cluster environments, set Scope to
Cluster.
- Click New.
- Enter the data source name
LSPS_DS and the JNDI name jdbc/LSPS_DS, and click Next.
- Select Select an existing JDBC provider with
Oracle JDBC driver (XA) and click Next.
- Set URL to
jdbc:oracle:thin:@127.0.0.1:1521:LSPSand select Use this data source in container managed persistence (CMP). Click Next.
- Set Authentication alias for XA recovery to
LSPS_DS_AUTH, Component-managed authentication alias to LSPS_DS_AUTH.
- Click Next and Finish.
- To set up a DB2 data source, do the following:
- On the left, expand Resources > JDBC and click Data sources:
- Select the visibility of the data source in the Scope dropdown; for cluster environments, set Scope to
Cluster.
- Click New.
- Enter the data source name
LSPS_DS and the JNDI name jdbc/LSPS_DS, and click Next.
- Select Select an existing JDBC provider with
DB2 Universal JDBC Driver Provider (XA)
- Set Driver type to
4.
- Set Database name to
lsps.
- Set Server name to
localhost.
- Set Port number to
50000
- Select Use this data source in container managed persistence (CMP).
- Set Authentication alias for XA recovery to
LSPS_DS_AUTH.
- Set Component-managed authentication alias to
LSPS_DS_AUTH.
- Define additional properties of the data source:
- Open the data source detail
- Click Custom properties on the right.
- Click New to create the properties:
- Create a JMS queue, JMS queue connection factory, and the corresponding JMS activation specifications Use the default messaging provider and store messages in the LSPS database:
- Expand Service Integration and click Buses.
- Click New and follow the wizard to create a new bus:
- Set the name to
LSPS_BUS.
- Unselect Bus security.
- On the Buses page, click LSPS_BUS
- On the detail page, click the Bus members link in the Topology section.
- Click Add and create a bus member with the following details:
- Server: default value
- Message store: Data store
- Use existing data source
- Data source JNDI name: jdbc/LSPS_DS
- Schema name: empty
- Authentication alias: LSPS_DS_AUTH
- Create tables: true
- Restrict long running locks: true (for cluster with High Availability)
- On the LSPS_BUS detail page, click Destinations in the Destination resources section:
- Click New and create a new queue:
- Destination type: Queue
- Identifier:
LSPS_DEST
- Bus member: your local server node
- Click New and create a new topic:
- Destination type: Topic space
- Identifier:
LSPS_TOPIC
- Expand Resources > JMS > Connection factories and create a connection factory:
- Set Scope to your local server node.
- Set provider to Default messaging provider.
- Set Name to
LSPS_CF.
- Set JNDI Name to
jms/LSPS_CF.
- Set BUS Name to
LSPS_BUS.
- Expand Resources > JMS > Queue and create a queue:
- Set Scope to your local server node.
- Set provider to Default messaging provider.
- Set Name to
LSPS_QUEUE.
- Set JNDI Name to
jms/LSPS_QUEUE.
- Set BUS Name to
LSPS_BUS.
- Set Queue Name to
LSPS_DEST.
- Expand Resources > JMS > Topic and create a topic:
- Scope: local server node
- Provider:
Default messaging provider
- Name:
LSPS_TOPIC
- JNDI Name:
jms/LSPS_TOPIC
- Bus name:
LSPS_BUS
- Topic space:
LSPS_TOPIC
- Go to Resources/JMS/Activation specifications and create activation specification:
- Expand Resources > JMS > Activation specification and create an activation specification:
- Scope: local server node
- Provider:
Default messaging provider
- Name:
LSPS_AS
- JNDI Name:
jms/LSPS_AS
- Destination type:
Queue
- Destination JNDI name:
jms/LSPS_QUEUE
- Bus name:
LSPS_BUS
- Create another activation specification:
- Provider:
Default messaging provider
- Name:
LSPS_WS_AS
- JNDI Name:
jms/LSPS_WS_AS
- Destination type:
Topic
- Destination JNDI name:
jms/LSPS_TOPIC
- Bus name:
LSPS_BUS
- Set up the LSPS security:
- Copy
lsps-security-websphere-\<LSPS_VERSION>.jar to $WAS_HOME/lib/ext, typically, C:\sw\IBM\WebSphere\AppServer\lib\ext.
- Save your changes.
- Restart WebSphere.
- Go to Security/Global Security:
- Enable administrative security:
true
- Enable application security:
true
- Go to Security/Global Security and configure the User account repository:
- Choose Standalone custom registry and click Set as current
- Click Configure:
- Primary administrative user name:
admin
- Custom registry class name:
com.whitestein.lsps.security.LSPSUserRegistry
- Go to Global Security -> LTPA -> LTPA timeout and set the LTPA timeout to the maximum period of time the user is expected to be active in a session, for example, 10 hours (600 minutes). After the period elapses, the user is logged out.
- Set the Session timeout: When the user is active, the session time is extended. When the user is inactive, they are logged out when the Session timeout has elapsed, at the latest after the LTPA timeout.
- Navigate to Servers > Server Types > WebSphere Application Servers
- Select your application server instance.
- On the Configuration tab select the Session Management link.
- Adjust the value in the Session timeout setting.
Note: You can use your own authentication, such as, LDAP; However make sure that every authenticated person exists in the LSPS table LSPS_PERSONS apart from your authentication source.
- Create a mail session: Expand Resources > Mail > Mail Sessions and create mail session:
- Set Scope to your local server node and click New.
- Under General Properties, set:
- Name to
LSPS_MAIL
- JNDI Name to
mail/LSPS_MAIL.
- Under Outgoing Mail Properties, set:
- Server:
<your mail server hostname/IP>
- Protocol: smtp/smtps
- User:
\<username\>
- Password:
\<password\>
- Verify Password: `<password>'
- Return e-mail address: '<return e-mail address>'
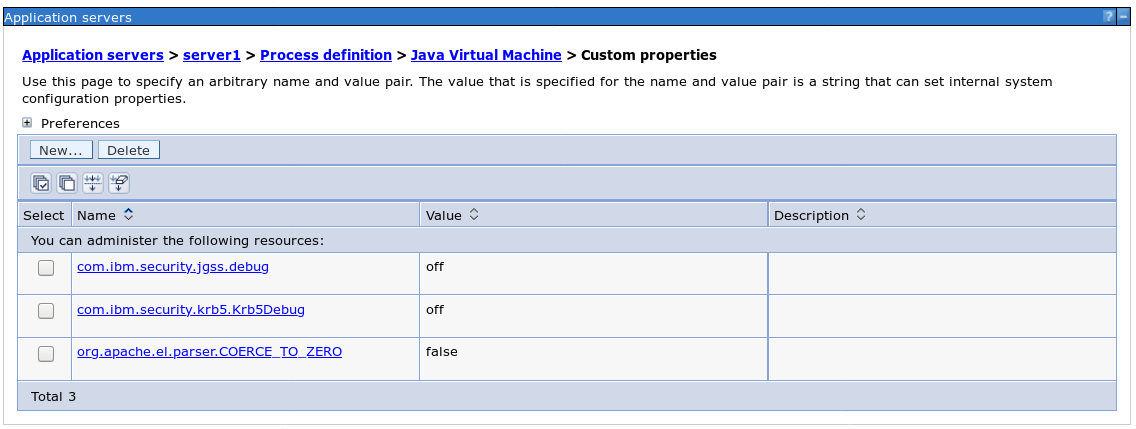
- Set org.apache.el.parser.COERCE_TO_ZERO property to false:
- Expand Servers > Server types > WebSphere application servers
- Click your server name.
- Under Server Infrastructure, expand Java and Process Management and click Process definition.
- Under Additional Properties, click Java Virtual Machine.
- Under Additional Properties, click Custom properties.
- Define the property org.apache.el.parser.COERCE_TO_ZERO with the value
false.
- Save your changes.
- Restart the server and deploy your customized LSPS application EAR.
Now you are ready to upload your modules to the server from PDS or with the command-line tool.