LSPS Documentation
Form components constitute your form hierarchy: They are implemented as Records with Fields and methods and have the forms::Form Record as its super type with the form widget.
Every component allows a set of common component actions and can define the following of properties:
ID: identifier of the component on design time
ID allows you to reference the component from another component in the form while designing it.
Modeling id: identifier of the component on runtime
Modeling id is generated automatically and serves to identify form components on runtime.
Caption: a String expression rendered as label
If the caption references localization identifiers, these are resolved automatically to the target locale. Note that the caption is rendered by the parent layout component. Hence if you create a form with a sole component with a caption, the caption will not be rendered in the form. This is due to limits of the Vaadin framework.
Component-specific properties can be set on the Detail tab in the Properties view or on the Init tab. Both become part of the form tree.
You will work with the following types of components:
Note that you can implement a custom form component if required.
Some form components hold a value: For example, a Text Area component holds a String value with its text. You can get the value with the getValue() call and set it with the setValue() call.
However, if you want to work with the value, you can bind the component to a variable or a variable field if the variable is of a Record type:
The variable must be of the same type as the value in the component, in the case of the Text Area, it must be of type String.
Note: If the user enters a value into a component, which cannot be stored in the target object, the component validation fails: In such a case, the value is not stored in the target object and an error message is displayed on the component.
To set the target object of binding, either call the setBinding() method or set the Binding property in the Properties view.
Note: By default, the binding is set to a default object which takes any value so you don't have to set the binding if not needed.
Depending on whether and when the binding value should be reloaded, you can use one of the following types:
Example: Let us consider a Form with three Label Fields (Label Fields are components that simply display the value of the Binding as a read-only value):
- LabelA uses Reference Binding to the Date variable
&varTimewith its initial value set to the time returned bynow()- LabelB uses Value Binding
now()- LabelC uses Closure Binding
now()All Labels will show the current date and time when the Form is loaded. If we add a Button component that will refresh the Label components on click, then on click:
- LabelA will display the value stored in the
varTimevariable.- LabelB will keep the same time value.
- LabelC will always update the time to the current time.
To get the value set in the component target object, call getValue() on the component.
Note: A component value is stored in the target object, only if it meets the formatting requirements, for example, if you enter a character into a Decimal Field, the value is ignored and the component displays an error. To work with such values, use the
getUserText()method.
To clear the component binding, call setBinding() with the reference parameter set to null.
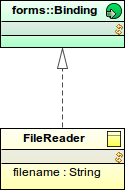
If you want to process binding data before they are used by a component, implement your custom Binding data type. This allows you, for example, to convert input values to other units.
get() returns the component valueset() sets the component valuegetBinding() returns the property of a RecordAndProperty object; the validations applicable for the property are used to validate the value (refer to the documentation on constraints); usually you want to return null;
FileReader {
  public Object get(){
      def File myfile := getResource("custom_binding", filename);
      fromBinaryToString(myfile.content);
    }
  public void set(Object value) {
      error("Cannot set target file! Readonly!")
  }
  public RecordAndProperty getBinding() {
    null
  }
}
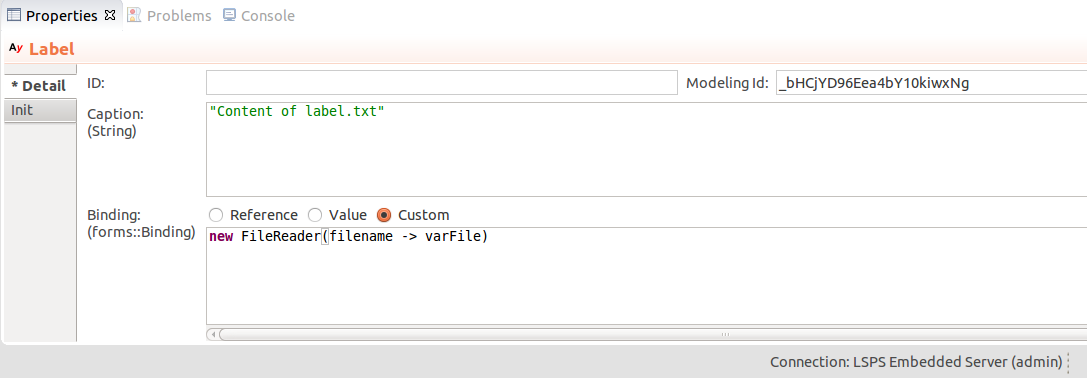
Now you can use your binding implementation as Custom Binding in your form. Consider using and distributing your implementation as part of a custom Library.
To define the initial value for a component where the data comes in later, define a form variable with the initial values; and define the binding as a closure that provides the appropriate data:
For example myFormVariable != null ? myFormVariable : null
When you insert a value into a form component, the form automatically checks if the value meets the basic format requirements, such as, whether you entered a decimal value in a Decimal Field
If you want to introduce further validation rules to a forms::form, you have the following options:
To add validation rules and validate the values in an input form component when the value might have changed, add validators to the components.
The value is validated against its validators on every validation run:
setValue() method is called, isValid() is called, the component is rendered, etc.To set a validator, call the addValidator() method on the component. The method takes a closure as its input argument:
null, the component is valid.If you want to validate only after some action takes place, name your input component and add the validator in the appropriate listener expression.
Example expression that adds a validator to a Date Field
MyDateField.addValidator (
  { dateValue:Date ->
    if
      dateValue > date(2018, 3, 3)
    then
         null
    else
        "The date must occur later than March 3, 2018."
    end
  }
)
You can get your validation messages and messages caused by incorrect input format with the getValidatorsMessages() or getValidatorsMessagesRecursive() methods.
When acquiring data for a record from a form, generally the input components in your form are bound to a record or record field: the binding is set to type Reference and its value to patient.ssn. For such form components, you can check whether the input values meet the record constraints and display the constraint messages, called data-error messages.
To validate the value and display data-error messages in a form, do one of the following:
inferValidator(): The method adds a validator to a component, which keeps checking the constraints of the bound Record Property and displays any returned constraint messages on the component. Note: The
inferValidator()creates a validator object for the component: The input value is assigned to the validator object only if it is in the correct format: If the users enters a string into a Date Field, the string does not make it into the validator object. Therefore, if you callinferValidator()after the form component has been assigned a value, then any subsequent invalid values are ignored and the first value is always restored.
validate() and showDataErrorMessages(): The validate() call returns a list of data-error messages and showDataErrorMessages() erases the currently displayed data-error messages and then displays the received data-error messages on the subtree of the second argument. { click ->
def List<ConstraintViolation> cv := validate(newUnit, null, null, null);
if cv.isEmpty()
then
//merge without optimistic-lock check:
myProxySet.merge(false, newUnit);
vocabTable.refresh();
else
def List<String> messages := collect(cv, {cvi:ConstraintViolation -> cvi.message});
//The showDataErrorMessages() function displays violation messages
//on the subtree of the component defined by the second argument.
//The validation messages are displayed on the components that have the Binding
//to the data that produced the constraint violation:
showDataErrorMessages(cv, MyButtonComponent);
end
}To get the data error messages of a form component, use the getDataErrorMessages() or getDataErrorMessagesRecursive() methods.
To clear the data error messages, use the clearConstraintViolations() function.
More information on constraints is available in the Modeling Guide.
To check if a component and all its children are valid, use call the isValid() method. The method searches for any validators, including inferred validators, that return a error message. If at least one error message is found, the method returns false.
Custom error messages are ignored by the isValid() method.
To have full control over when an value in an is validated, use the custom error message of components: With the setCustomErrorMessage() method, you can set and display one arbitrary error message on any component.
To get the error messages of a form component, call the getCustomErrorMessage() method and to clear the error messages, call setCustomErrorMessage(null) on your component.
Since error messages are not produced by validators or constraint mechanism, they do not represent a validation breach: consequently, the isValid() call IGNORES error messages. They are simply messages attached to components.
{ e ->
  def String val := text.getValue() as String;
  if val.isBlank() or val.length() < 3  then
    //setting error message on a component:
    text.setCustomErrorMessage("Must be at least 3 characters.");
  else
    Forms.submit()
  end
}To collect the custom error, data error, and validator messages on a form component, use the getAllErrorMessages() or getAllErrorMessagesRecursive() methods.