LSPS Documentation
Important: This section deals with implementing custom form components for the ui module forms. Information on how to implement a custom forms component is available here.
You can implement a custom ui form component either in Java or in the Expression Language:
Before you implement a custom UI component, make sure to get familiar with execution levels since ui forms are automatically created on the screen level with the aim to isolate the data in the form so that a form can be discarded without leaving the data in an inconsistent state.
This section primarily describes how to implement a custom UI component in Vaadin 8 component.
Important: UI Vaadin 8 implementation is a new forms implementation and is not compatible with the previously used UI Vaadin 7 implementation. A list of differences between the implementations is available in the here. To keep using the UI Vaadin 7 implementation, set UIComponentFactoryV7Impl as the UIComponentFactory. Where applicable, an admonition with instructions on how to implement UI Vaadin 7 when you are using UIComponentFactoryV7Impl.
To define and declare a custom form component, do the following:
<YOUR_APP>-vaadin-war/pom.xml file and configure the maven Vaadin plugin.vaadin-client-compiler dependency.@Widgetset("com.whitestein.lsps.vaadin.webapp.MyWidgetSet")<YOUR_APP>-vaadin-war/pom.xml and add the maven dependency to the Vaadin component jar file.Create the custom component class in your application in a dedicated package in the <YOUR_APP>-vaadin project):
The implementing class must meet the following requirements:
com.whitestein.lsps.vaadin.ui.components.UIComponent.com.vaadin.ui.<Component> class. Do not extend the form components of the Standard Library since their methods might change. For UI Vaadin 7, import and extend the v7 versions of the components, for example, use
com.vaadin.v7.ui.Labelinstead ofcom.vaadin.ui.Label.
It implements the refresh() method.
An example Label Component implementation in UI Vaadin 8
import com.vaadin.ui.AbstractComponent;
import com.vaadin.ui.Label;
import com.whitestein.lsps.vaadin.ui.UIComponentData;
import com.whitestein.lsps.vaadin.ui.components.UIComponent;
import com.whitestein.lsps.vaadin.util.Variant;

public class MyLabel extends Label implements UIComponent {

  private final UIComponentData uic;

  public MyLabel(UIComponentData uic) {
    this.uic = uic;
  }

  @Override
  public UIComponentData getComponentData() {
    return uic;
  }

  @Override
  public void refresh() {
    String suffixText = getProperty("suffix");
    String content = getProperty("content");
    suffixText = getLocalizedString(suffixText);
    content = getLocalizedString(content);
    setValue(content + " " + suffixText);
  }

  private String getLocalizedString(String string) {
    return uic.getScreen()
        .getContextHolder()
        .getAppConnector()
        .getLocalizer()
        .getLocalizedString(string, this);
  }

  private String getProperty(String propertyName) {
    return Variant //variant allows to set the scope of closure and handle any null values;
        .definitionOf(this) //get the record of MyLabel (wrapped in Variant)
        .getPropertyValue(propertyName).closure() //get text property value and cast to closure
        .inScope(this)//set the scope of the closure
        .call().string().valueOrNull(); //execute; cast result to string, and get value (unwrap the variant to get the value)
  }

  @Override
  public AbstractComponent getWidget() {
    return this;
  }
}Important: Make sure your module imports the
uimodule of the Standard Library.
{ -> <parameter_value> }).Note: If the custom component extends a non-abstract UIComponent, it is rendered as its UIComponent parent and the Displayed in Editor setting is ignored.
connectors package of the vaadin project, create a factory class that extends UIComponentFactoryV8Impl. For UI Vaadin 7, extend
UIComponentFactoryV7Impl
public class MyUIComponentFactoryV8Impl extends UIComponentFactoryV8Impl {

  public MyUIComponentFactoryV8Impl(LspsAppConnector connector) {
    super(connector);
  }

  @Override
  protected UIComponent createComponent(UIComponentData componentData) {
    final String type = componentData.getDefinition().getTypeFullName();
    if (type.equals("customUIComponent::UICustomLabel")) {
      return new CustomUiComponent(componentData);
    }
    return super.createComponent(componentData);
  }
}DefaultLspsAppConnector class in the core package of the vaadin project, return your factory in getComponentFactory().
public class DefaultLspsAppConnector extends LspsAppConnectorImpl {

  private static final long serialVersionUID = 6600639435905976895L;

  public DefaultLspsAppConnector(LspsUI ui) {
    super(ui);
  }

  @Override
  public UIComponentFactory getComponentFactory() {
    //returns the custom ui factory:
    return new MyUIComponentFactoryV8Impl(this);
  }
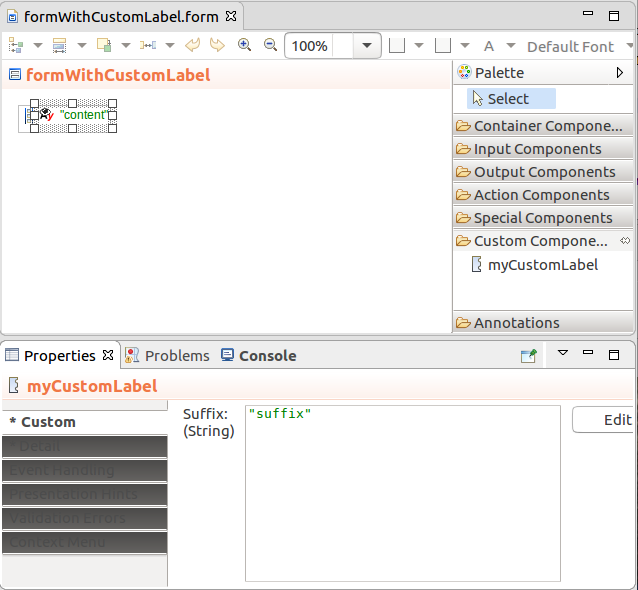
You can now use the custom component in your ui definition.
Don't forget to upload the module with your ui component record and declaration along with the LSPS Application. Consider distributing the components as part of a library.
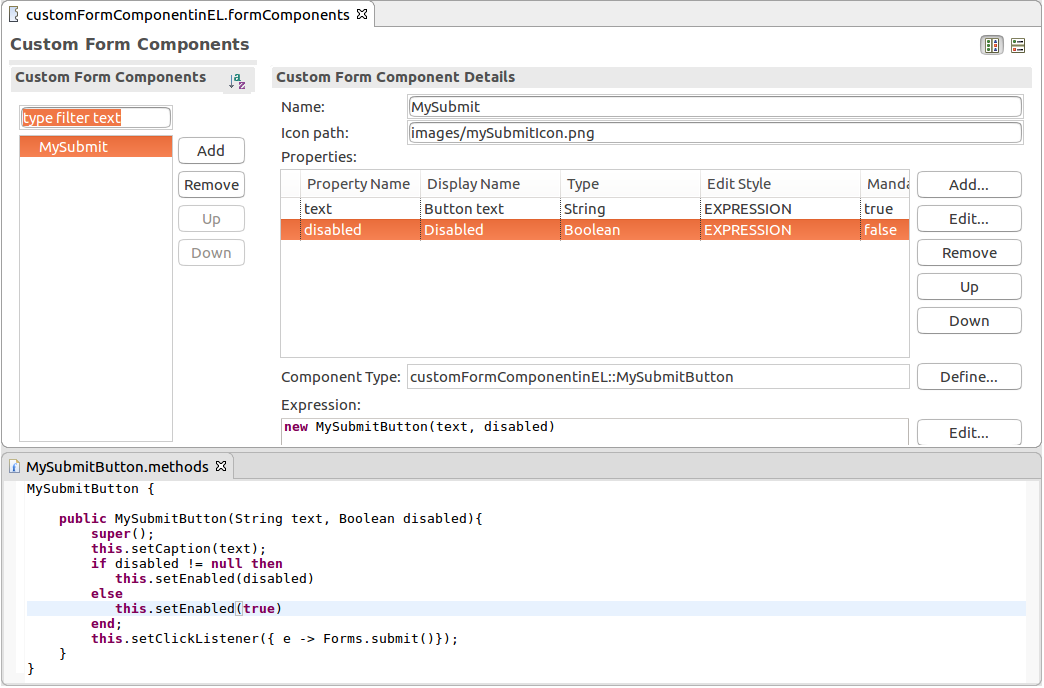
To create a custom component implemented in the Expression Language, do the following:
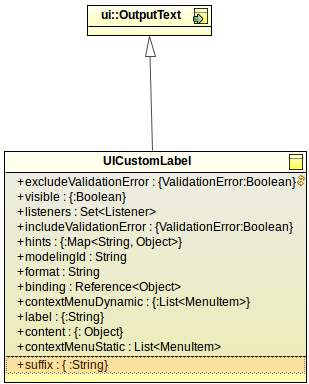
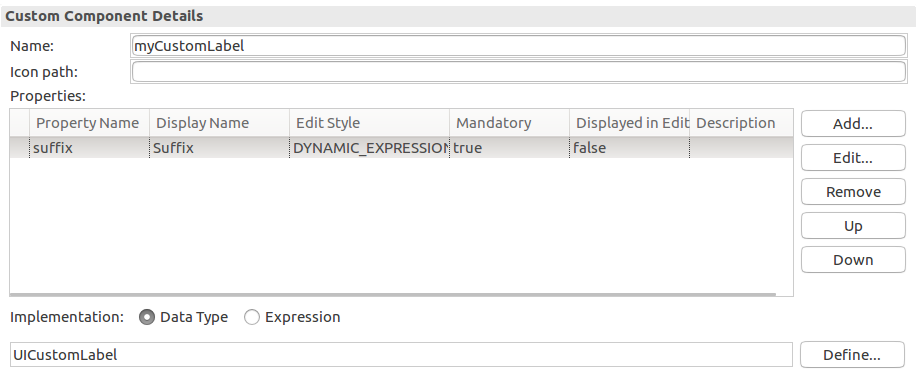
ui::UIComponent record. Add any additional fields which the user needs to populate when they will use the component.{ -> <parameter_value> }).Displayed in Editor: if set to true, the defined value of the property is displayed in the graphical depiction of the component in the Form editor
Note that only one property can be displayed in the component graphical depiction.
If the custom component extends a non-abstract UIComponent, it is rendered as its UIComponent parent and the Displayed in Editor setting is ignored.
//create checkbox:
def ui::CheckBox cb := new ui::CheckBox();
def Boolean checked;
//bind checkbox to variable checked:
cb.binding := &checked;
//activate immediate mode for checkbox:
cb.triggerProcessingOnChange := true;
//handle value change of checkbos: refresh the checkbox list to have all boxes unchecked:
cb.listeners := { new ValueChangeListener(
  refresh -> { a -> {checkBoxList}},
  handle -> {a -> if not checked then *(checkBoxList.binding) := {}; end; }
  )
};
//return checkbox:
cb;To create a custom event for your custom form component, you need to do the following:
UIEvent.Pass the data type as the second parameter of the event constructor.
The parameter can be based on the record related to the component record.
getEventProperties() method so it returns a hashmap of the custom event properties. package com.whitestein.colorpicker.vaadin.util;
import java.util.HashMap;
import java.util.Map;
import com.vaadin.shared.ui.colorpicker.Color;
import com.whitestein.lsps.lang.Decimal;
import com.whitestein.lsps.lang.exec.RecordHolder;
import com.whitestein.lsps.vaadin.ui.components.UIComponent;
import com.whitestein.lsps.vaadin.ui.events.UIEvent;
public class UIColorPickEvent extends UIEvent {
private final Color newColor;
public UIColorPickEvent(UIComponent component, Color newColor) {
super(component, colorpicker::ColorPickEvent);
this.newColor = newColor;
}
private static RecordHolder toColor(UIComponent context, Color color) {
final RecordHolder c =
context.getComponentData().getScreen().getScreenContext().getNamespace()
.createRecord("colorpicker::Color");
c.setProperty("r", new Decimal(color.getRed()));
c.setProperty("g", new Decimal(color.getGreen()));
c.setProperty("b", new Decimal(color.getBlue()));
c.setProperty("a", new Decimal(color.getAlpha()));
return c;
}
@Override
//creates java hashmap -> fieldname to value; then creates the uicolorpickevent recordholder;
protected Map<String, ?> getEventProperties(UIComponent component) {
final Map<String, Object> result =
new HashMap<String, Object>(super.getEventProperties(component));
result.put("color", toColor(component, newColor));
return result;
}
}getComponentData() method. UIComponentData includes such data about the component as its parent component, its depth from the root component, etc.Create the custom listener.
The listener should override the method that creates the event on the component, in the example colorChanged(ColorChangeEvent e) so the event is transformed into a custom event. It enters the event queue of the event-processing cycle when UIComponents.fireAndProcess() method is called.
LspsAppComponentFactory class: uncomment the createComponent method and add the constructor call for your component that is called when the respective Record is requested. package org.eko.ekoapp.vaadin.util;
import org.eko.ekoapp.vaadin.components.UIText;
import com.whitestein.lsps.vaadin.LspsAppConnector;
import com.whitestein.lsps.vaadin.ui.UIComponentData;
import com.whitestein.lsps.vaadin.ui.UIComponentFactoryImpl;
import com.whitestein.lsps.vaadin.ui.components.UIComponent;
public class MyComponentFactory extends UIComponentFactoryImpl {
public MyComponentFactory(LspsAppConnector connector)
throws NullPointerException {
super(connector);
}
@Override
protected UIComponent createComponent(UIComponentData componentData) {
String type = componentData.getComponentDefinition().getType()
.getFullName();
if (type.equals("customComponentModule::TextComponentRecord")) {
return new UIText(componentData);
}
return super.createComponent(componentData);
}
}
public UIColorPicker(UIComponentData data) {
  this.data = data;
  ColorChangeListener listener = new ColorChangeListener() {

    @Override
    public void colorChanged(ColorChangeEvent event) {
      final Color newColor = event.getColor();
      UIComponents.fireAndProcess(new UIColorPickEvent(UIColorPicker.this, newColor));
    }
  };
  //registered to vaadin's color picker
  addColorChangeListener(listener);
  UIComponents.afterCreate(this);
@Override
public void refresh() {
  Variant.RecordVariant color = Variant.definitionOf(this).getPropertyValue("color").closure()
      .inScope(this).call().record();
  color.checkType("colorpicker::Color").checkPresent();
  setColor(toColor(color));
}

private static Color toColor(Variant.RecordVariant color) {
  return new Color(color.getPropertyValue("r").decimal().get().intValue(),
      color.getPropertyValue("g").decimal().get().intValue(),
      color.getPropertyValue("b").decimal().get().intValue(),
      color.getPropertyValue("a").decimal().or(new Decimal(255)).intValue());
}package com.whitestein.colorpicker.vaadin.util;
import com.vaadin.shared.ui.colorpicker.Color;
import com.vaadin.ui.ColorPicker;
import com.vaadin.ui.components.colorpicker.ColorChangeEvent;
import com.vaadin.ui.components.colorpicker.ColorChangeListener;
import com.whitestein.lsps.lang.Decimal;
import com.whitestein.lsps.vaadin.ui.UIComponentData;
import com.whitestein.lsps.vaadin.ui.components.UIComponent;
import com.whitestein.lsps.vaadin.ui.events.UIEvent;
import com.whitestein.lsps.vaadin.util.UIComponents;
import com.whitestein.lsps.vaadin.util.Variant;
public class UIColorPicker extends ColorPicker implements UIComponent {
private final UIComponentData data;
public UIColorPicker(UIComponentData data) {
this.data = data;
ColorChangeListener listener = new ColorChangeListener() {
@Override
public void colorChanged(ColorChangeEvent event) {
final Color newColor = event.getColor();
UIComponents.fireAndProcess(new UIColorPickEvent(UIColorPicker.this, newColor));
}
};
//registered to vaadin's color picker
addColorChangeListener(listener);
UIComponents.afterCreate(this);
}
@Override
public void refresh() {
Variant.RecordVariant color = Variant.definitionOf(this).getPropertyValue("color").closure()
.inScope(this).call().record();
color.checkType("colorpicker::Color").checkPresent();
setColor(toColor(color));
}
private static Color toColor(Variant.RecordVariant color) {
return new Color(color.getPropertyValue("r").decimal().get().intValue(),
color.getPropertyValue("g").decimal().get().intValue(),
color.getPropertyValue("b").decimal().get().intValue(),
color.getPropertyValue("a").decimal().or(new Decimal(255)).intValue());
}
@Override
public UIComponentData getComponentData() {
return data;
}
}source that holds the component that produced the event and a field with the data the implementation requires.new colorpicker::ColorPickListener(
refresh -> {a->{PICKER}},
handle -> {e:ColorPickEvent-> color:=e.color; debugLog({->"Color was picked. " + e})}
)